Most monogram tools ask you to design something. This one asks you to choose something. The library holds thirty finished monograms — quinceañera crowns, wedding crests, graduation emblems, neon party lettering — and every one of them arrives already drawn, already balanced, already the right thing to put on a backdrop. Your job is to put the right name on it and pick the colours the event is using.
That distinction is the whole point, because nothing here is generated by AI. The artwork is rendered, not invented, so the same design with the same settings comes back identical every single time. If a client approves a look on Tuesday and changes the colour on Thursday, you get the exact same monogram in the new colour rather than a new interpretation of it — and you get it in about twenty seconds.
Before you start
- The text, written the way it should printA name, a couple, an occasion — "Isabella's Quince", "Nancy & Carlos". Type it in normal capitalisation: the design renders your text literally, so what you type is what gets drawn.
- The event colours, by nameNot hex codes. Every colour here is a dropdown of named options — Royal Blue, Rose Gold, Sage Green — so "royal blue with silver" is a more useful thing to arrive with than a swatch from the invitation.
- Where it is going to be usedA monogram for a printed backdrop or a template needs a transparent background. One for a projector or a gobo needs a black one. It is a single click at the end, but it changes which button you press.
The seven steps
There is only one screen. The library sits on the left, the form for whatever you have selected sits on the right, and the whole thing is over in a couple of minutes. Only the last step — generating — costs a credit.
Find the design
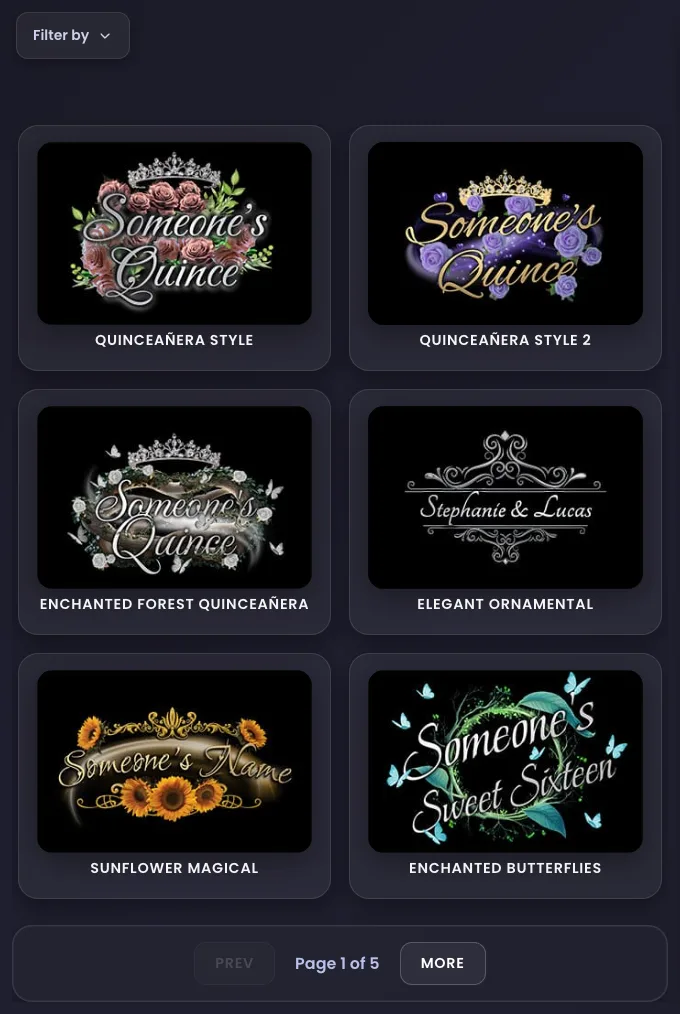
Thirty monograms, six to a page, five pages. More walks forward, Prev walks back and Filter by narrows the grid to an occasion: Quince / Sweet 16, Wedding, Graduation, Corporate, Party, Western / Rustic, Elegant, Themed and Floral.
Choose on structure rather than colour. Whether the design has a crown, a frame, roses, butterflies or nothing but beautiful type is fixed — that is the artwork. The colours are all yours to change in a moment, so a gold thumbnail is not a gold monogram, it is a monogram waiting for your palette.
Nothing in the library fits? Request a Monogram sits at the end of the last page. Describe what you need, attach an example image if you have one, and the design team usually adds it to the collection within 24 to 48 hours — for everyone, not just for you.
Type the text
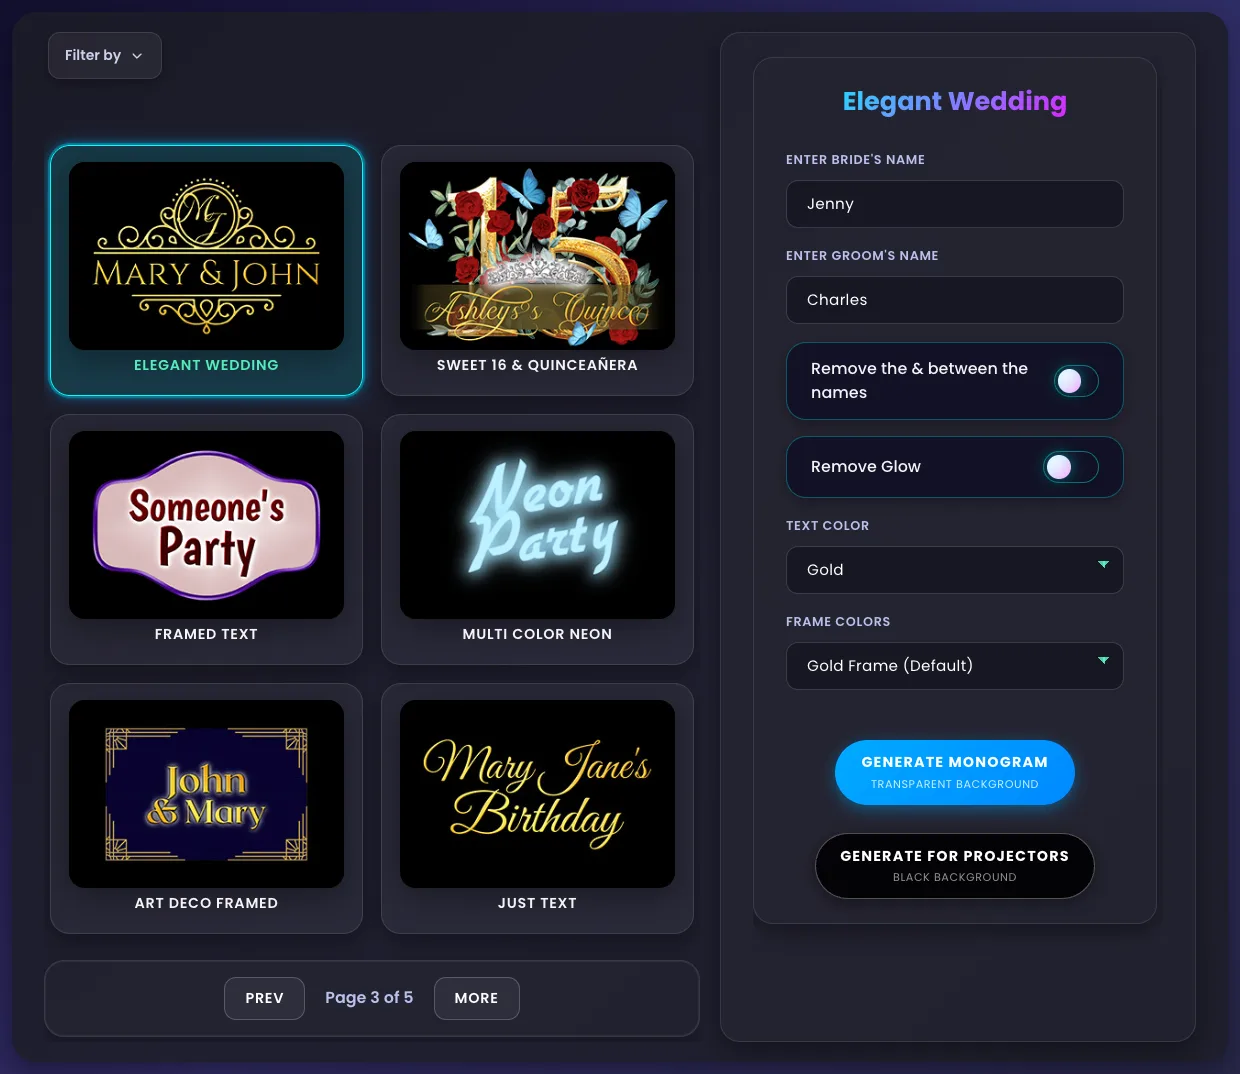
Most designs take a single Monogram Text field. The three couple designs — the two Elegant Weddings and Pastel Wedding — take two instead: Enter Bride's Name and Enter Groom's Name, drawn either side of an ampersand.
Nothing to generate with yet? That is deliberate. The two generate buttons do not appear at all until there is text in the field, so an empty form simply has no way to spend your credit.
The one habit worth breaking here is typing in capitals. The renderer sets your text exactly as you wrote it, and these are mostly script and calligraphic faces — SOFIA in a cursive font is a row of disconnected capitals where Sofia is a signature.
Set the colours and the switches
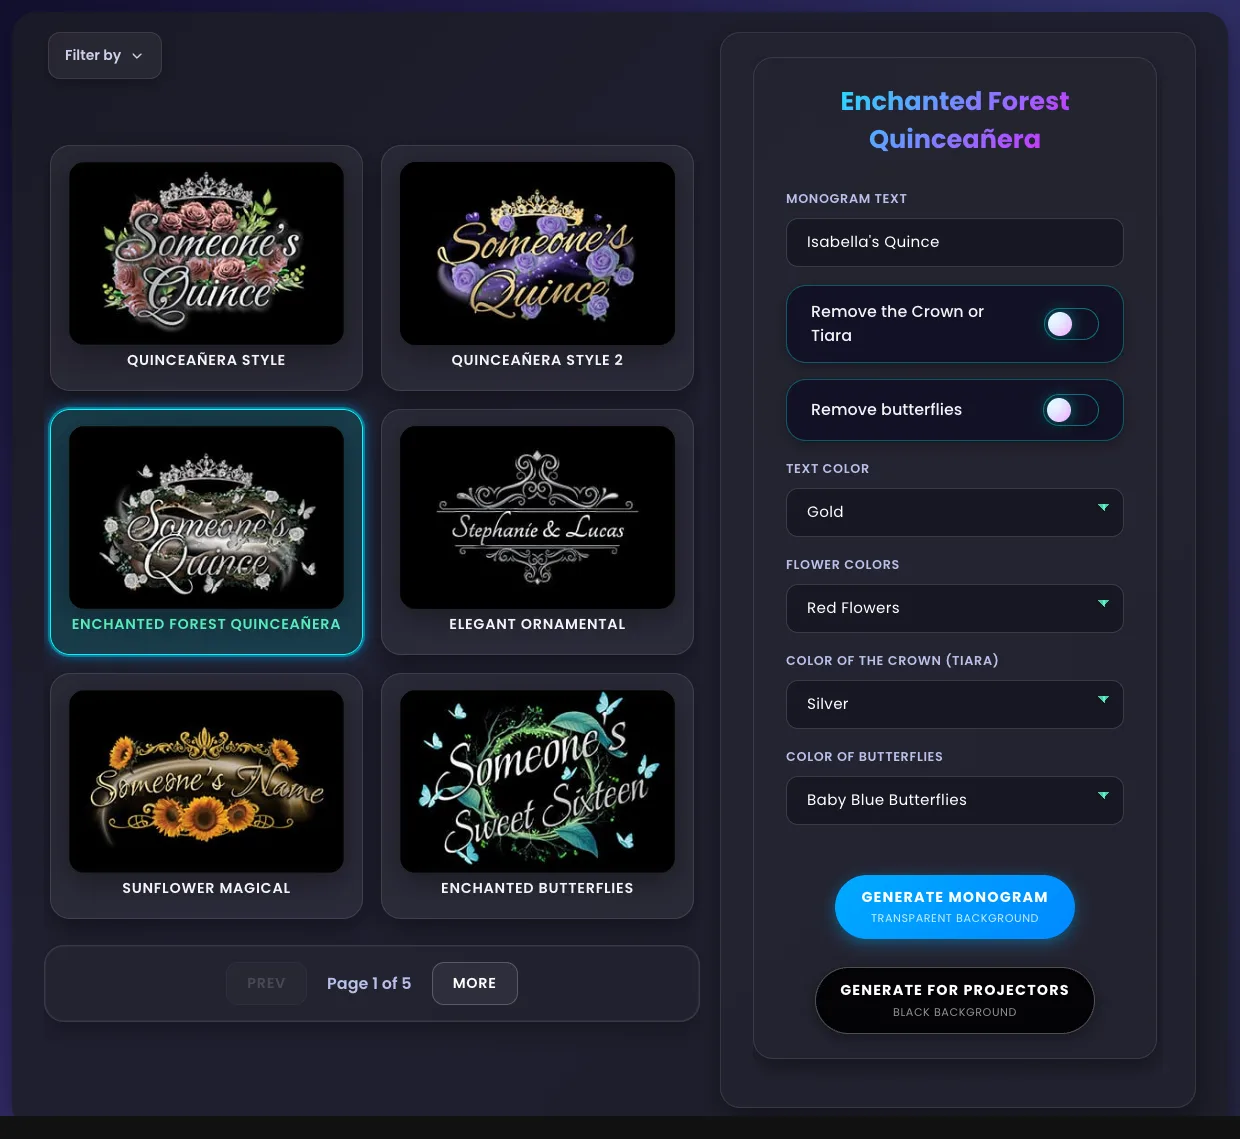
This is where the designs stop looking alike. The panel is built from the artwork you picked, so Enchanted Forest Quinceañera offers Text Color, Flower Colors, Color of the crown (Tiara) and Color of butterflies, while Sweet 16 & Quinceañera swaps the big 15 for a 16 with Change background number from 15 to 16 and stacks five colour dropdowns under it. Some designs — Under the Sea, for one — offer nothing at all beyond the text, because their palette is part of the illustration.
The switches remove elements: Remove the Crown or Tiara, Remove Butterflies, Remove the & between the names, Remove Glow. Turn one off and its colour dropdown disappears with it, which is the fastest way to tell what a switch actually controls.
One thing that catches people: the form always opens on the first item of each list, even when a later item is the one labelled "(Default)". On Enchanted Forest that means the flowers start on Red Flowers, not on the pink the thumbnail shows. If you want what you saw in the grid, set it yourself.
Check the font before you commit
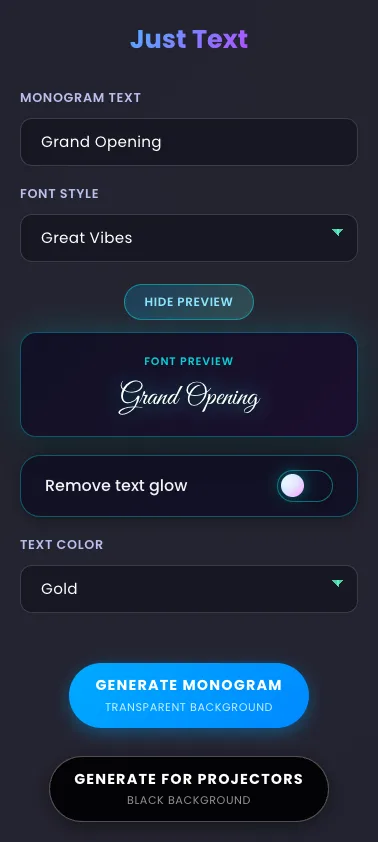
Thirteen of the thirty designs carry a Font Style list — Just Text, Bling Bling Diamonds, Western Cowgirl and ten more — and the longest of those lists runs to twenty-two faces, from Great Vibes to Fredericka the Great.
Do not pick from the names. Preview Font draws your own text in the selected face, at a size you can actually judge, right there in the form. Tangerine and MonteCarlo are indistinguishable in a dropdown and nothing alike on a six-foot backdrop.
That button stays in English whichever language you are browsing in, along with the Font Preview label above the sample. It is a quirk of the interface, not a sign you are on the wrong page.
Pick the background and generate
Two buttons, and the difference is the background, not the quality. Generate Monogram returns the artwork on a transparent background — the one you want for a photo booth template, an invitation, a printed backdrop or anything you will lay over something else.
Generate for Projectors returns the same artwork on a black background instead. That is what a projector or a gobo needs, because black is what a beam of light reads as nothing.
They cost the same: one credit either way, spent only when a file actually comes back. If the render fails you keep the credit. When in doubt take the transparent one — you can always put it on a black rectangle, but you cannot take a black rectangle off.
Wait about twenty seconds
The panel switches to a progress bar and "We are creating your monogram…". Because nothing is being invented — the design is being rendered with your values — this is quick: seconds rather than the minute or two an AI generation takes.
The bar climbs to 98% and sits there. That is not a stall. The percentage is an estimate running on a timer, and the jump to 100% is the file actually arriving.
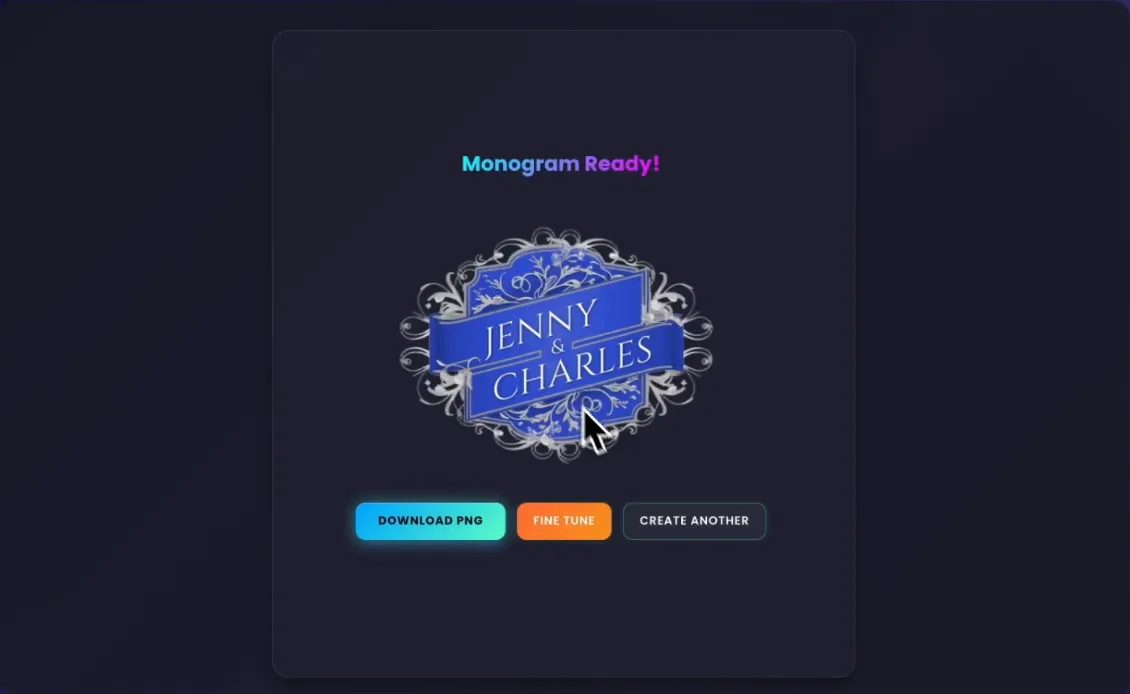
What comes back is a high-resolution PNG with real transparency, shown at full size with Download PNG, Fine Tune and Create Another underneath it.
Download it, or push it further
Download PNG saves the file straight away. Worth knowing before you have six of them in your downloads folder: the file is named after the design, not after your text, so you get Style10.png rather than Jenny-and-Charles.png. Rename it as it lands.
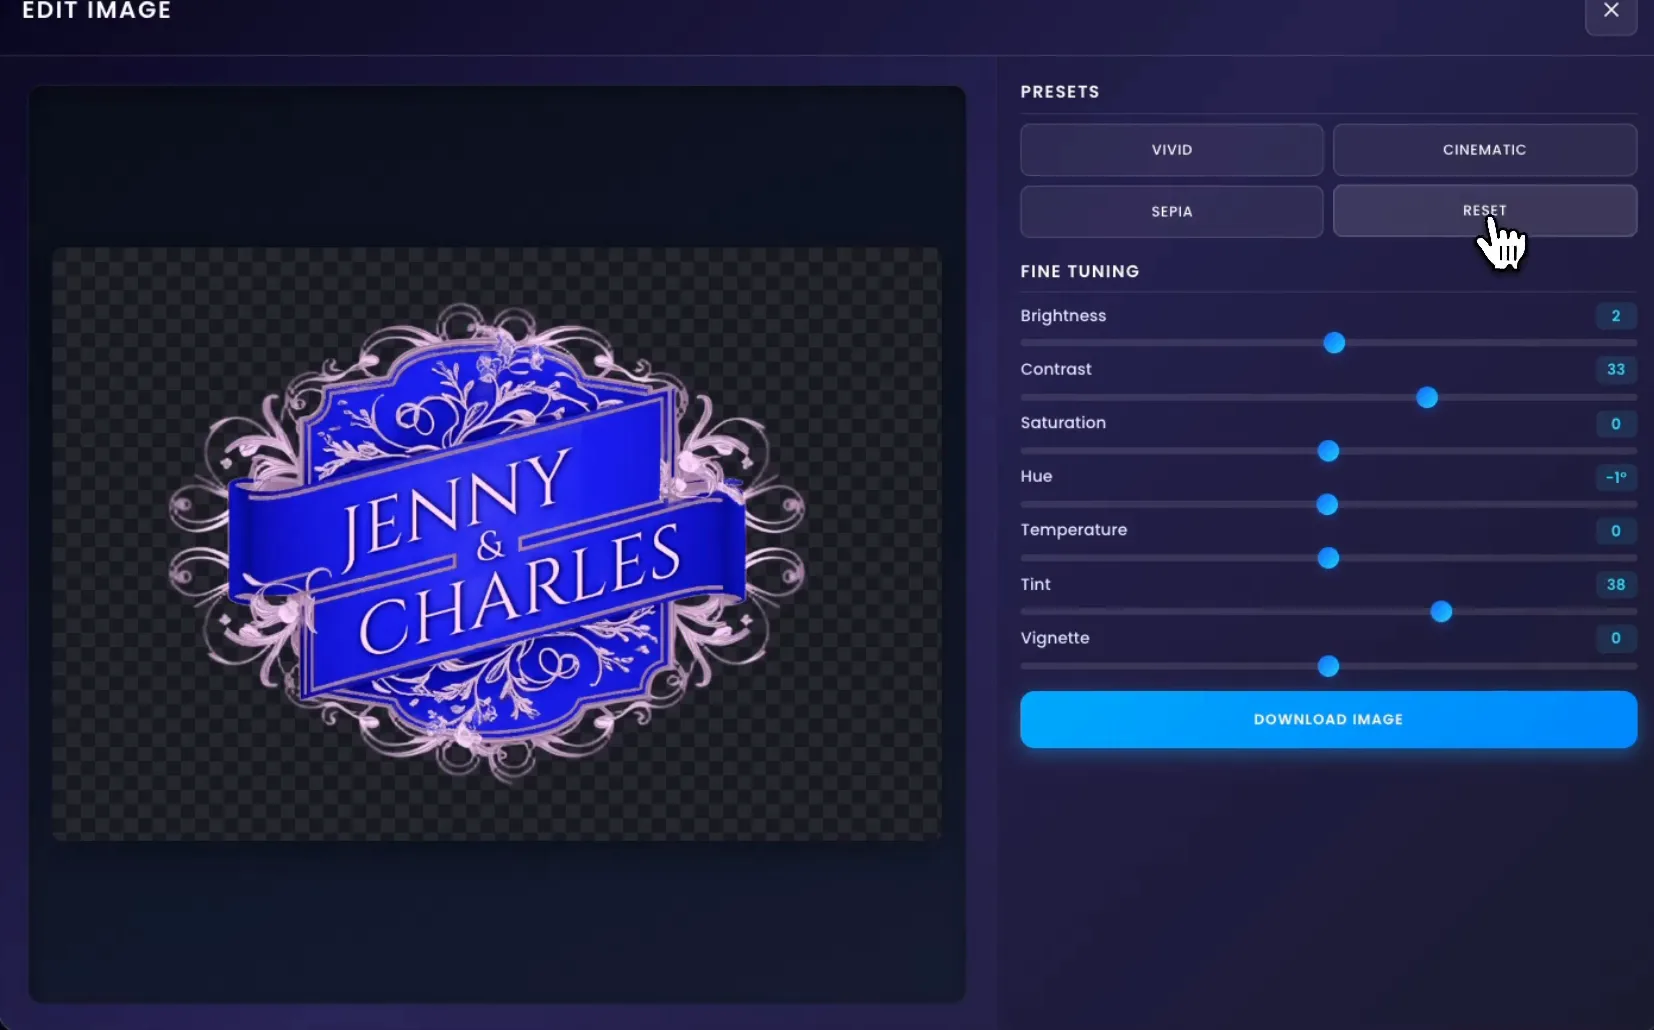
Fine Tune opens Edit Image on top of the finished monogram: presets for Vivid, Cinematic, Sepia and Reset, then sliders for Brightness, Contrast, Saturation, Hue, Temperature, Tint and Vignette, and a Download Image button of its own. It costs nothing and it never touches the original, so it is the right place to warm a monogram up to match a venue's lighting, or to pull the whole thing a few degrees towards the blue on the invitation.
The checkerboard behind the artwork is not part of the design — that is how the editor draws transparency. Those are the areas that will show whatever you place the monogram on.
Getting better results
Settle on the design before you touch a colour
Selecting a different design rebuilds the form from scratch — your text and every colour go back to defaults. Browse first, decide, then customise.
Contrast beats matching
A monogram is going on a backdrop, a screen or a print. Light text on a dark background reads across a room; gold on ivory disappears at four metres. The wedding walkthrough in the video uses white text on royal blue for exactly that reason.
Generate the variants while you are here
One credit each, twenty seconds each. If the client might want it in rose gold as well as silver, produce both now — it is far cheaper than reconstructing your settings next week.
Take the transparent version even for a projector job
It is the more useful file of the two. Transparent drops onto anything, and adding a black background afterwards takes a second in any editor.
Use Fine Tune instead of regenerating
If the only problem is that the monogram reads slightly warm or slightly flat, the editor fixes it for free. Save the credit for an actual change of design.
Common mistakes
Typing the name in capitals
The text is rendered exactly as you write it. Script faces are drawn to flow between lowercase letters, and all-caps turns a signature into a row of unconnected shapes.
Expecting Create Another to keep your settings
It clears the form back to that design's defaults. The design is repeatable — the same choices always give the same monogram — but the choices themselves are not saved, so note the combination down if it took you a while to find.
Generating for projectors and then putting it on a template
The black background is baked into the file, not a preview. On a template it lands as a black rectangle around the artwork.
Filtering by Holiday, Birthday or Sports
Those three categories are in the filter but no design carries them yet, so the grid comes back empty with "No styles available." Nothing is broken — clear the filter and use Themed or Party instead.
Trusting the thumbnail colours
The grid shows each design in its illustrated colours, which are not the values the form opens on. Read the dropdowns before you generate, not the picture.
Library or AI?
CreativeBooth has two monogram tools and they answer different questions. This one is a library: the design already exists, it renders in seconds, it never surprises you, and you can come back in a month and get the identical file. That is what you want when a look has been approved, when the same event needs a second monogram that matches the first, or when you simply need something good in two minutes.
The AI monogram generator is the other end. You describe the event, or hand it an invitation and ask for something in that style, and it designs artwork that did not exist before. Slower, one of a kind, and the right call when nothing in these thirty designs is the thing you can see in your head. It has a walkthrough of its own.
Read: how to make a monogram with AIFrequently asked questions
Do I need design software?
No. Everything happens in the browser: you pick a design, type the text, choose colours from dropdowns and press generate. What comes back is a finished high-resolution PNG with a transparent background, so there is nothing to cut out or flatten afterwards.
How long does it take?
About twenty seconds. The designs are rendered rather than generated by AI, which is why they come back so much faster than an AI monogram and why the same settings always produce the same file.
How many designs are there?
Thirty, across quinceañera and Sweet 16, weddings, graduations, corporate, party, western and rustic, elegant, themed and floral. Six are shown per page across five pages, and the Filter by control narrows the grid to one occasion.
Why can I not see the generate buttons?
Because the text field is still empty. The two generate buttons only appear once there is something to render, which on the couple designs means both the bride's name and the groom's name.
What is the difference between the two generate buttons?
Generate Monogram gives you a transparent background, which is what templates, invitations and printed backdrops need. Generate for Projectors gives you the same artwork on black, which is what a projector or gobo needs. Both cost one credit.
Can I change the colours after generating?
Up to a point. Fine Tune opens an image editor with presets and sliders for brightness, contrast, saturation, hue, temperature, tint and vignette, and it is free. For a different element colour, change the dropdown and generate again — the design will come back identical apart from what you changed.
Can I turn the monogram into an animated loop?
Yes, but from the video monogram maker rather than from this screen. That tool opens this same library inside its first step, and as soon as the monogram is ready it carries you on to choosing a format, a gallery of animated styles and an HD loop. It only ever generates the transparent version, never the projector one.
What if the design I want is not in the library?
Use Request a Monogram at the end of the last page. Describe the style, colours and occasion, attach an example image if you have one, and new designs are typically added within 24 to 48 hours.
Customize your first monogram
Pick the design closest to the event, type the name properly, spend a minute on the colours and press Generate Monogram. Twenty seconds later you have a transparent PNG that goes on a template, an invitation, a welcome sign or a backdrop — and if the client changes their mind about the colour, you are twenty seconds from the new one.