A still monogram on a projector stops being interesting about four minutes into a party. The same artwork with light moving through it, petals drifting past and a sweep of gold crossing the lettering holds a room all night — and it is the difference between a printed sign and a screen that feels like part of the event.
This guide covers making one: a twenty-second HD loop that plays on repeat, in landscape, square or portrait, with no video editor and no animation software involved. Four steps — monogram, format, style, and a Scene Editor where you make it yours — and the only moment that spends a credit is the render at the end.
Before you start
- A name and an occasion — or no monogram at allThe text that goes big — "Andrew & Leah", "Sofia's Quince", a surname. If you already have artwork you can skip this, and if you only want an animated welcome screen you can skip the monogram entirely.
- A transparent PNG, if you are bringing your ownThe animation is layered behind and around the artwork, so the artwork cannot carry a background of its own. Bring a transparent PNG if you have one; if you do not, the first step builds one for you in a couple of minutes.
- The shape of the screen it will play onLandscape 16:9 for projectors, TVs and LED walls; portrait 9:16 for vertical displays and most photo booth screens; square 1:1 for square panels and social posts. Each loop is twenty seconds long.
- An account, and one or two creditsOne credit for the HD render, and one more only if you generate the monogram here. A full run is 2 credits, or 1 credit if you upload your own artwork or go without a monogram. New accounts start with five free credits.
Four ways to start
The first screen asks where your monogram is coming from, because the animation is built around it. All four options lead to the same formats and styles — the difference is who makes the artwork, and what it costs.
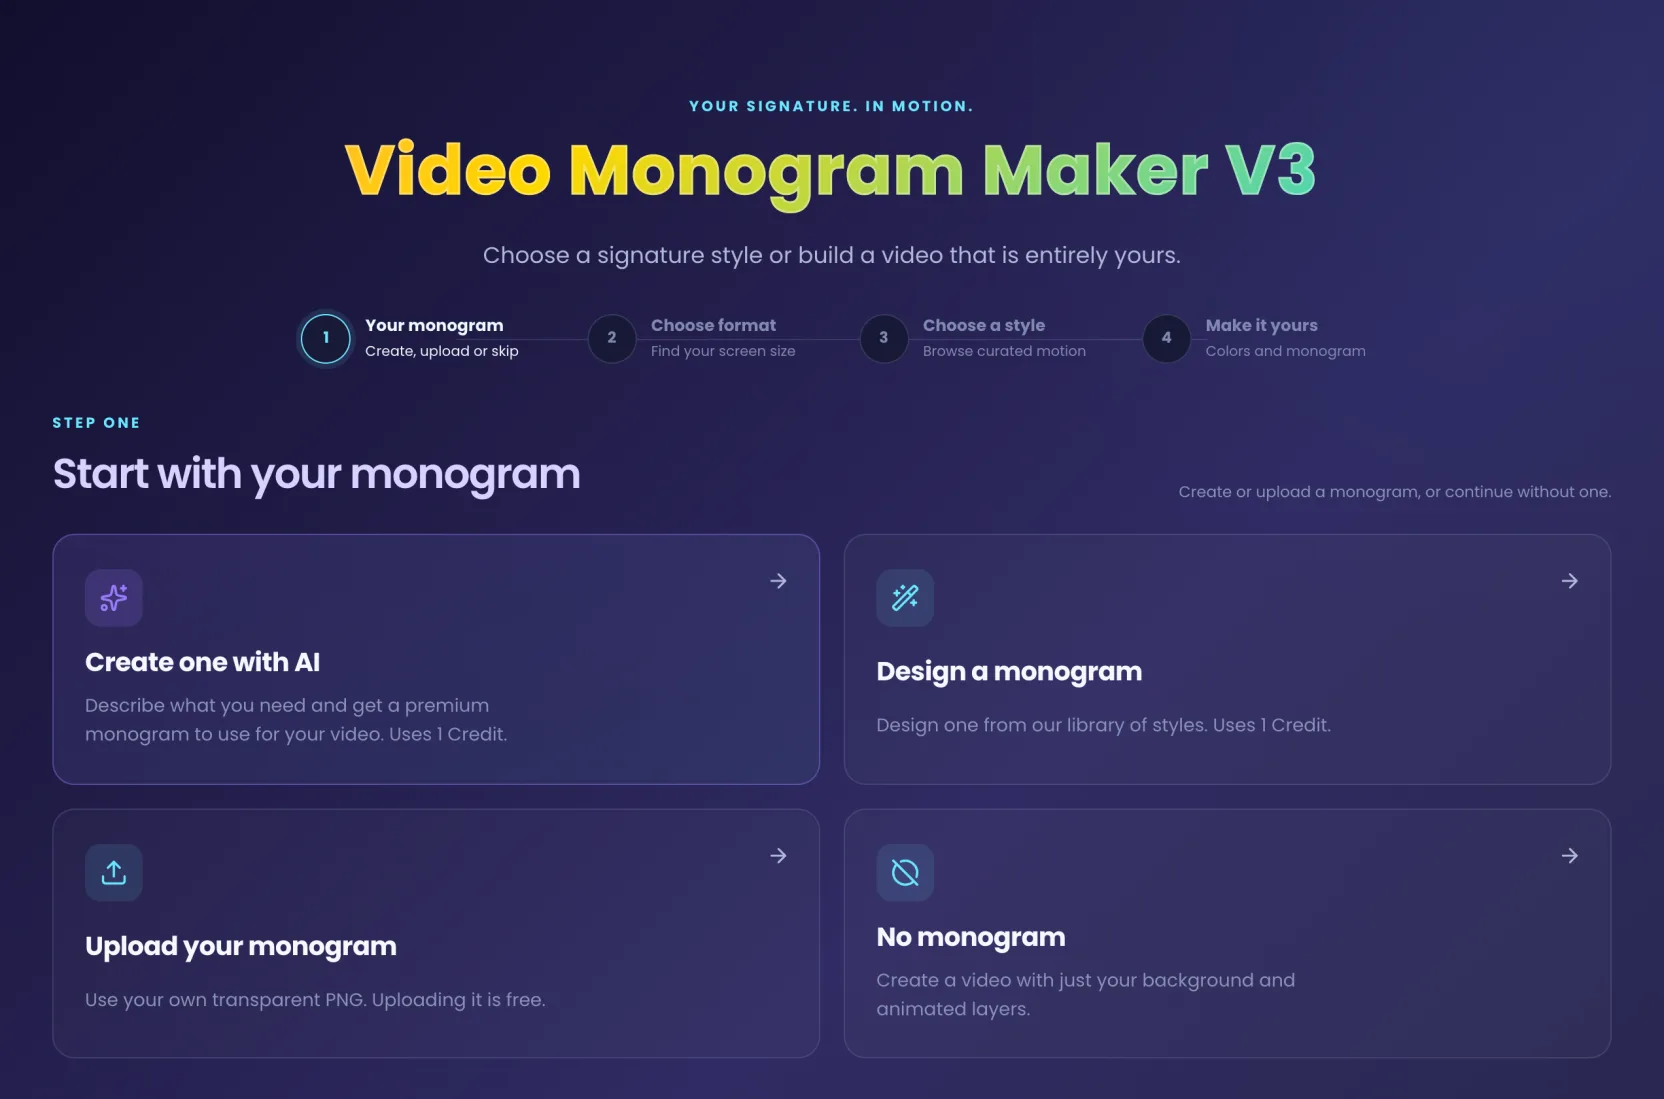
Create one with AI
Describe the event, or hand over an invitation and have the monogram match its style. The right choice when nothing in the style library fits what you have in mind.
Design a monogram
Pick a design from the style library, type the name, choose the colours. Fastest and most predictable, because you are filling in a finished design rather than describing one.
Upload your monogram
You already have a transparent PNG — one you made earlier, or one a designer sent you. Uploading it is free, so the whole run costs a single credit.
No monogram
A video with just the background and the animated layers. Made for welcome screens and photo booth start screens, where a Touch to Start animation does the talking.
So a full run is 2 credits — one for the monogram, one for the render — and 1 credit if you bring your own PNG or skip the monogram. The render itself always costs exactly one.
Step 1: your monogram
Whichever route you take, this step ends the same way: the tool shows the artwork with Your monogram is ready and moves you straight on to choosing a format.
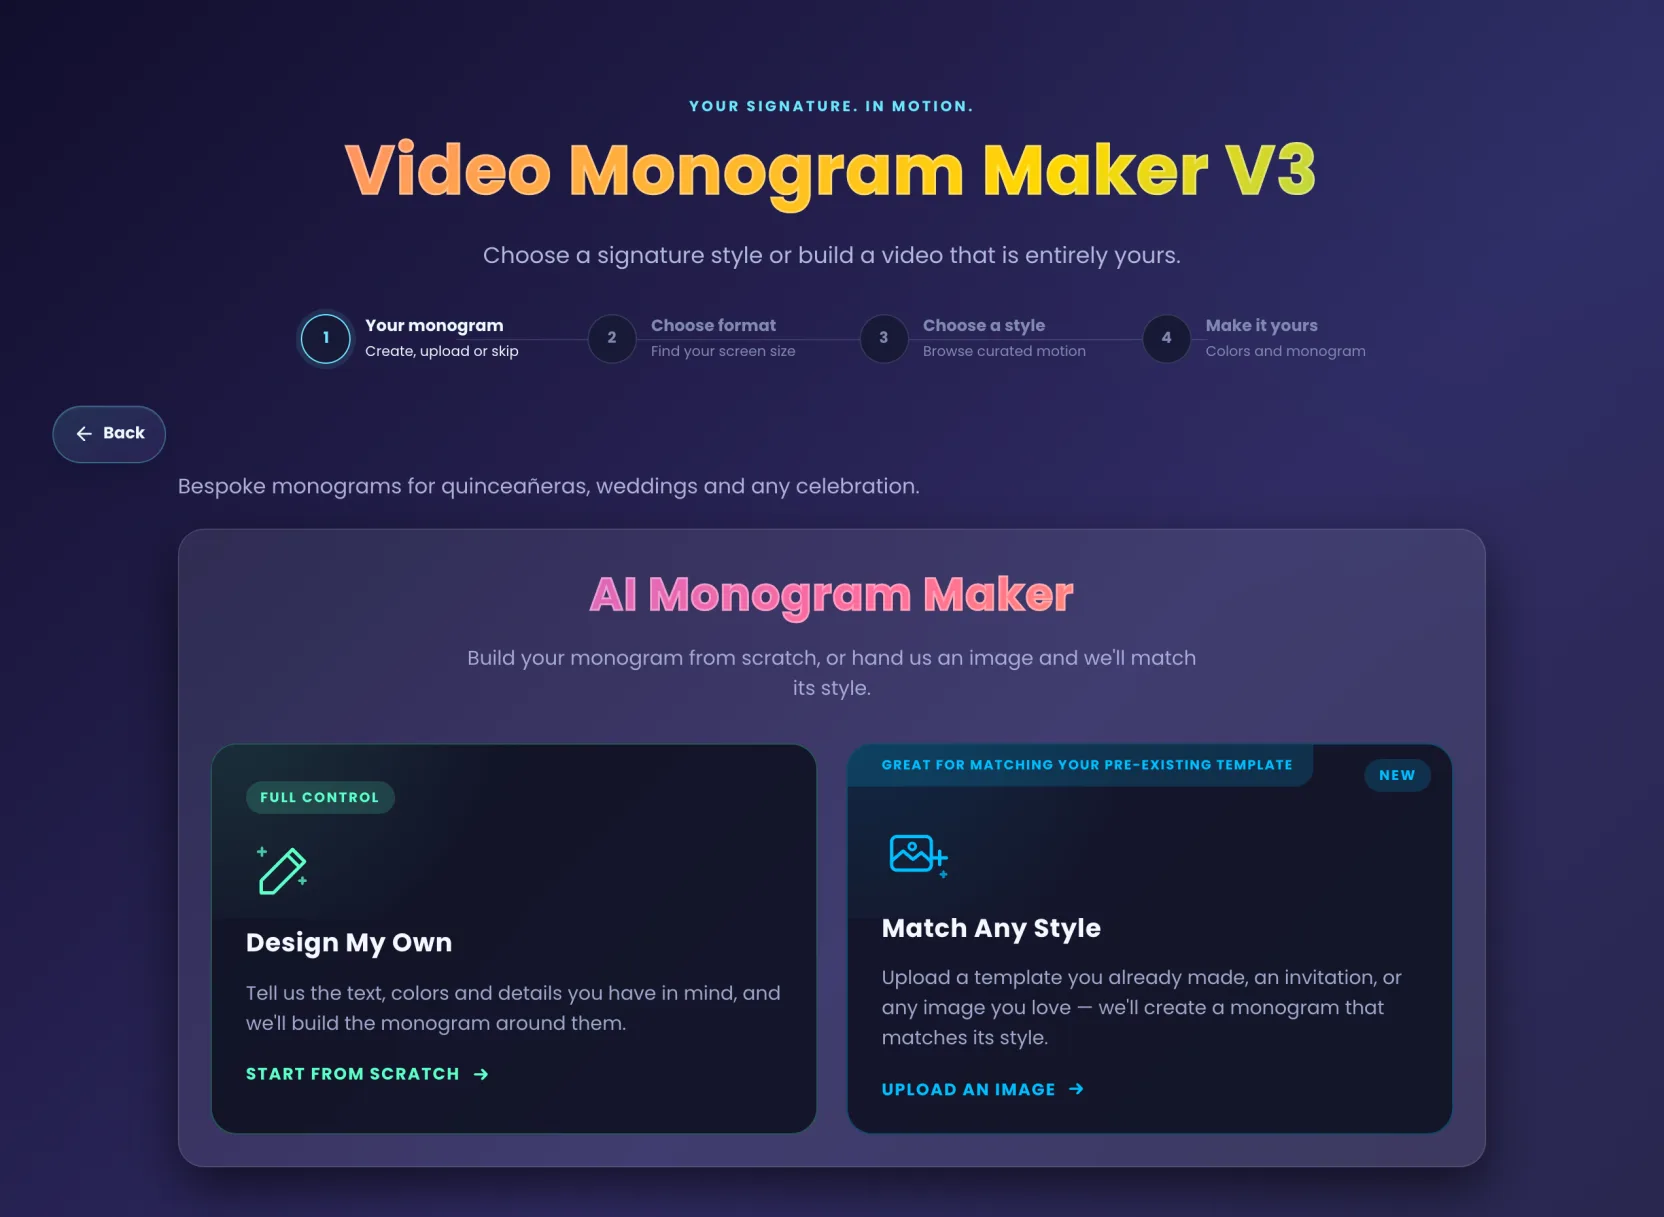
Create one with AI
The AI generator opens inside the video tool, with the same two entry points it has on its own page. Design My Own builds the monogram from the text, colours and details you describe. Match Any Style takes an invitation, a template or any image you like and produces a monogram that belongs with it.
It is the slower of the two generators and the one that surprises you, in both directions. Give it a minute or two.
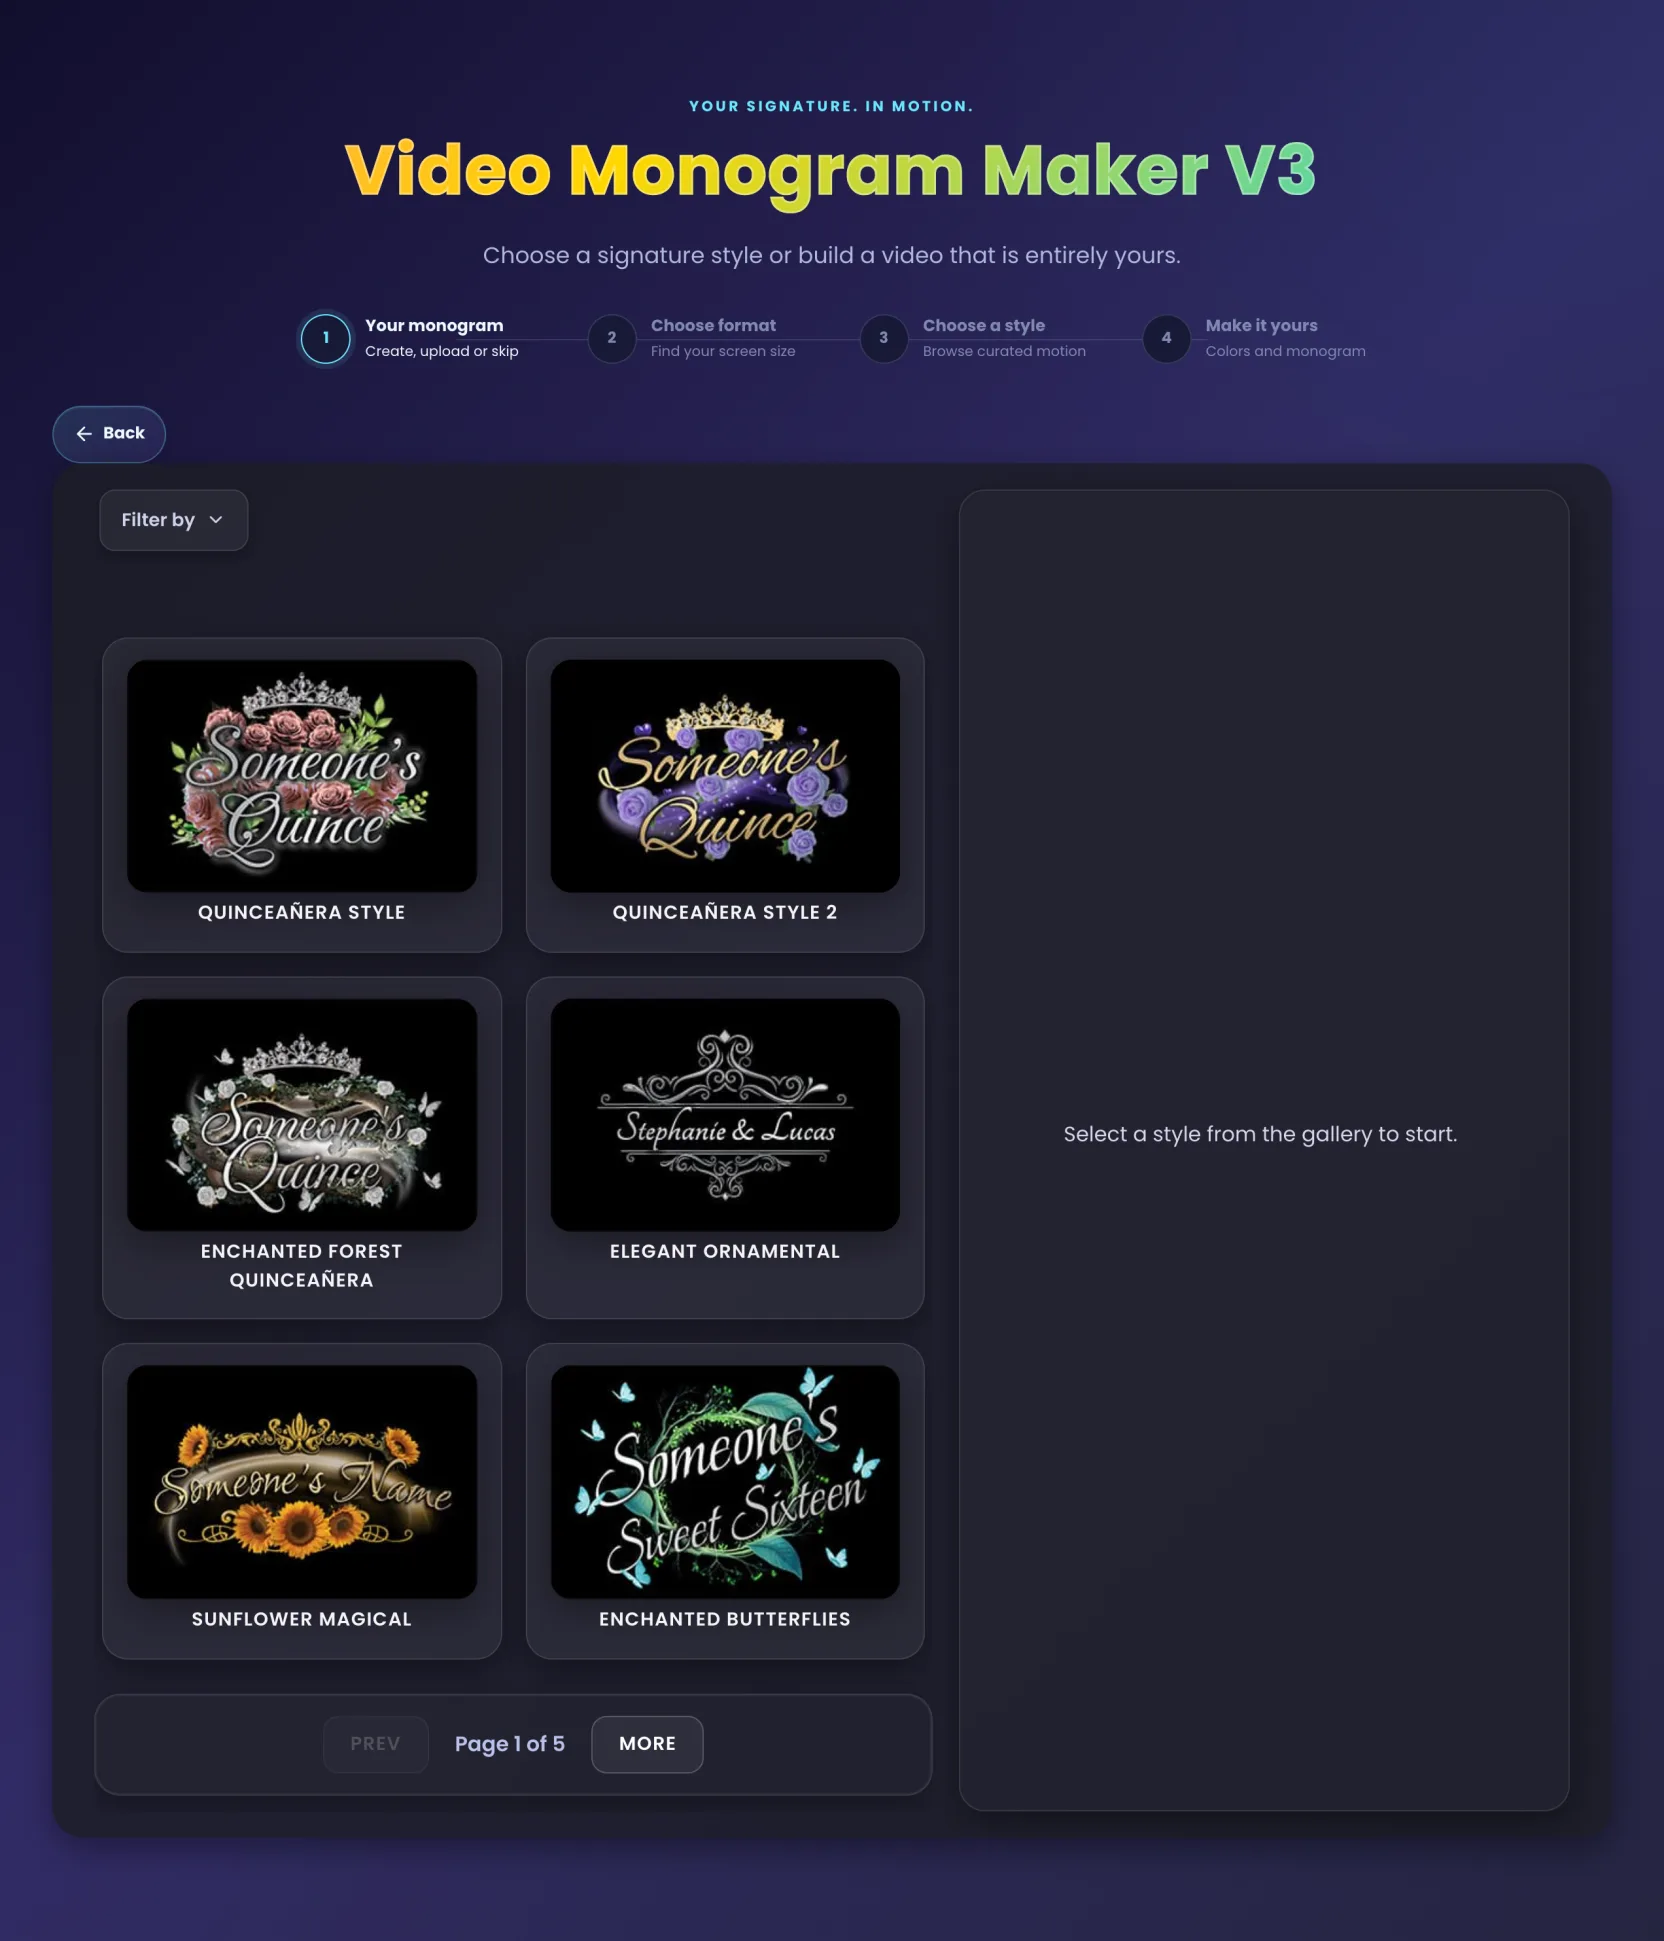
Or design one from the style library
The style library is a catalogue of finished designs with your text swapped in — quinceañera, wedding, sweet sixteen, graduation. Filter by narrows the grid by occasion, and the form on the right changes with the style, because each design exposes only what it can actually alter.
Monogram Text is the one constant. The rest are that design's own parts: Text Color, Flower Colors, the colour of a crown, a switch to remove it. Nothing here is free text, so there is no prompt to get right.
One button generates: Generate Monogram, with a transparent background. The projector version — the one with a black background — is deliberately not offered inside the video tool, because a black rectangle behind your monogram would block the animation completely.
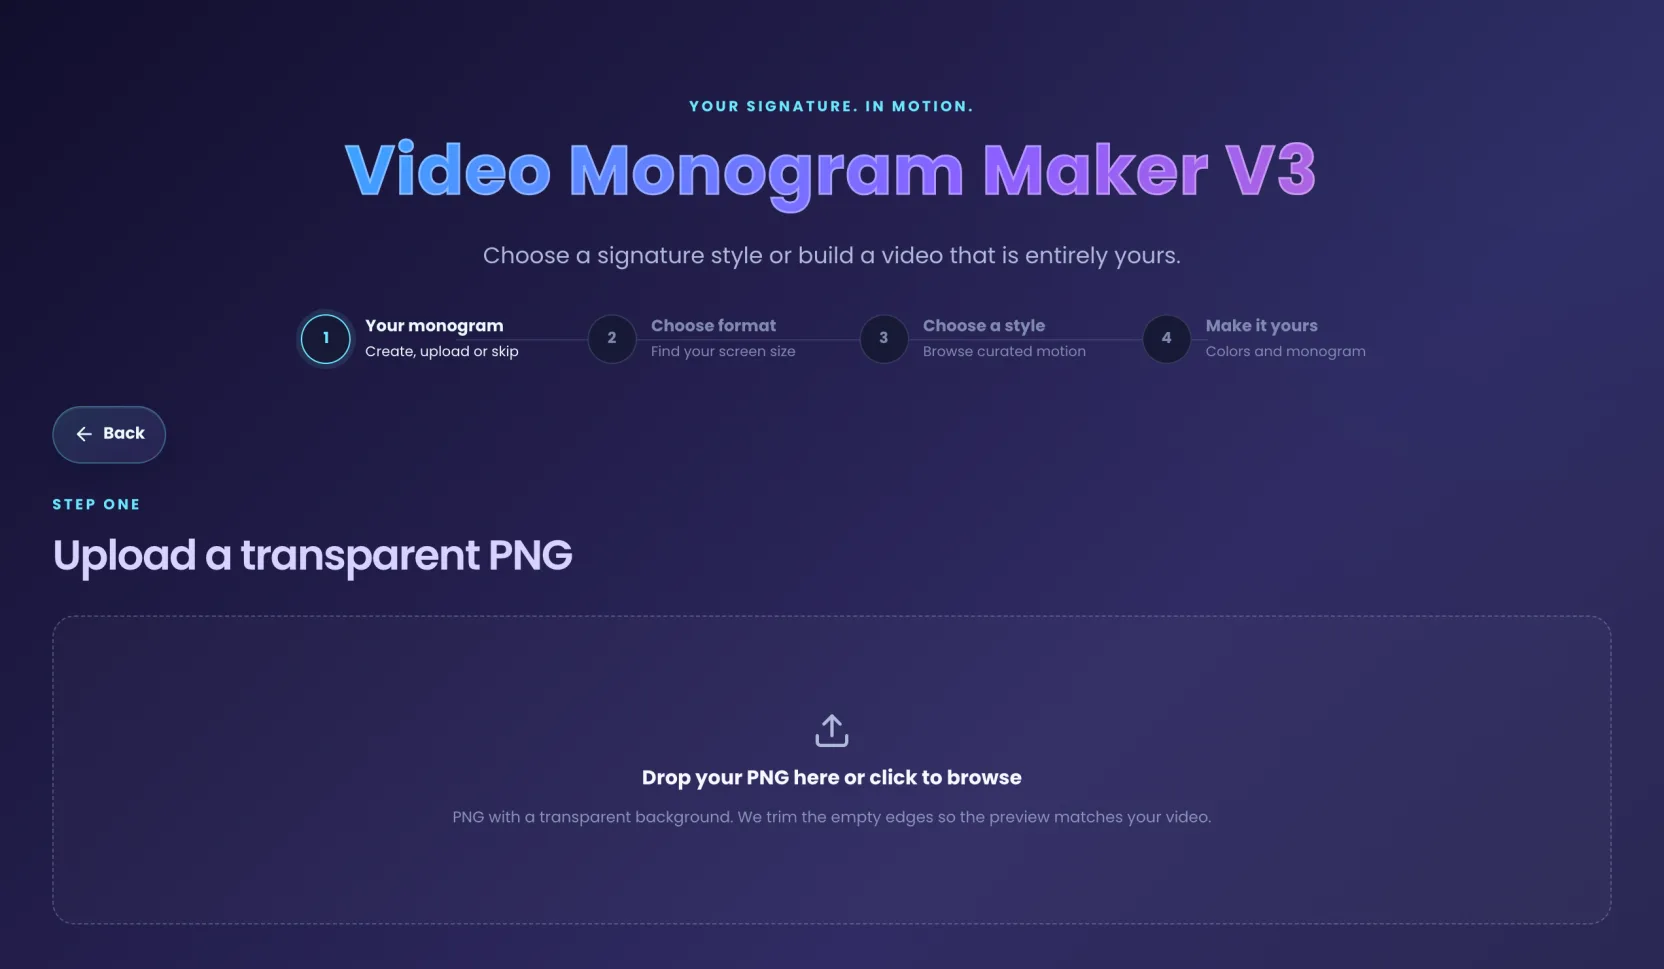
Or upload the PNG you already have
Drag the file onto the dropzone or click to browse. This route accepts PNG only — a JPEG cannot be transparent, so it would compose as an opaque rectangle sitting on top of the animation, and the tool turns it away rather than letting you find that out at the end.
The empty edges get trimmed in your browser, which is what makes the preview in the Scene Editor line up with the finished video.
Or continue with No monogram
One click and you are on the format step. The scene is composed from the background and the animated layers alone, the Monogram tab disappears from the editor, and everything else — styles, your own scene, AI backgrounds, Touch to Start — works exactly the same.
Changed your mind? Change monogram on the next screen takes you back to these four options.
Step 2: choose the format
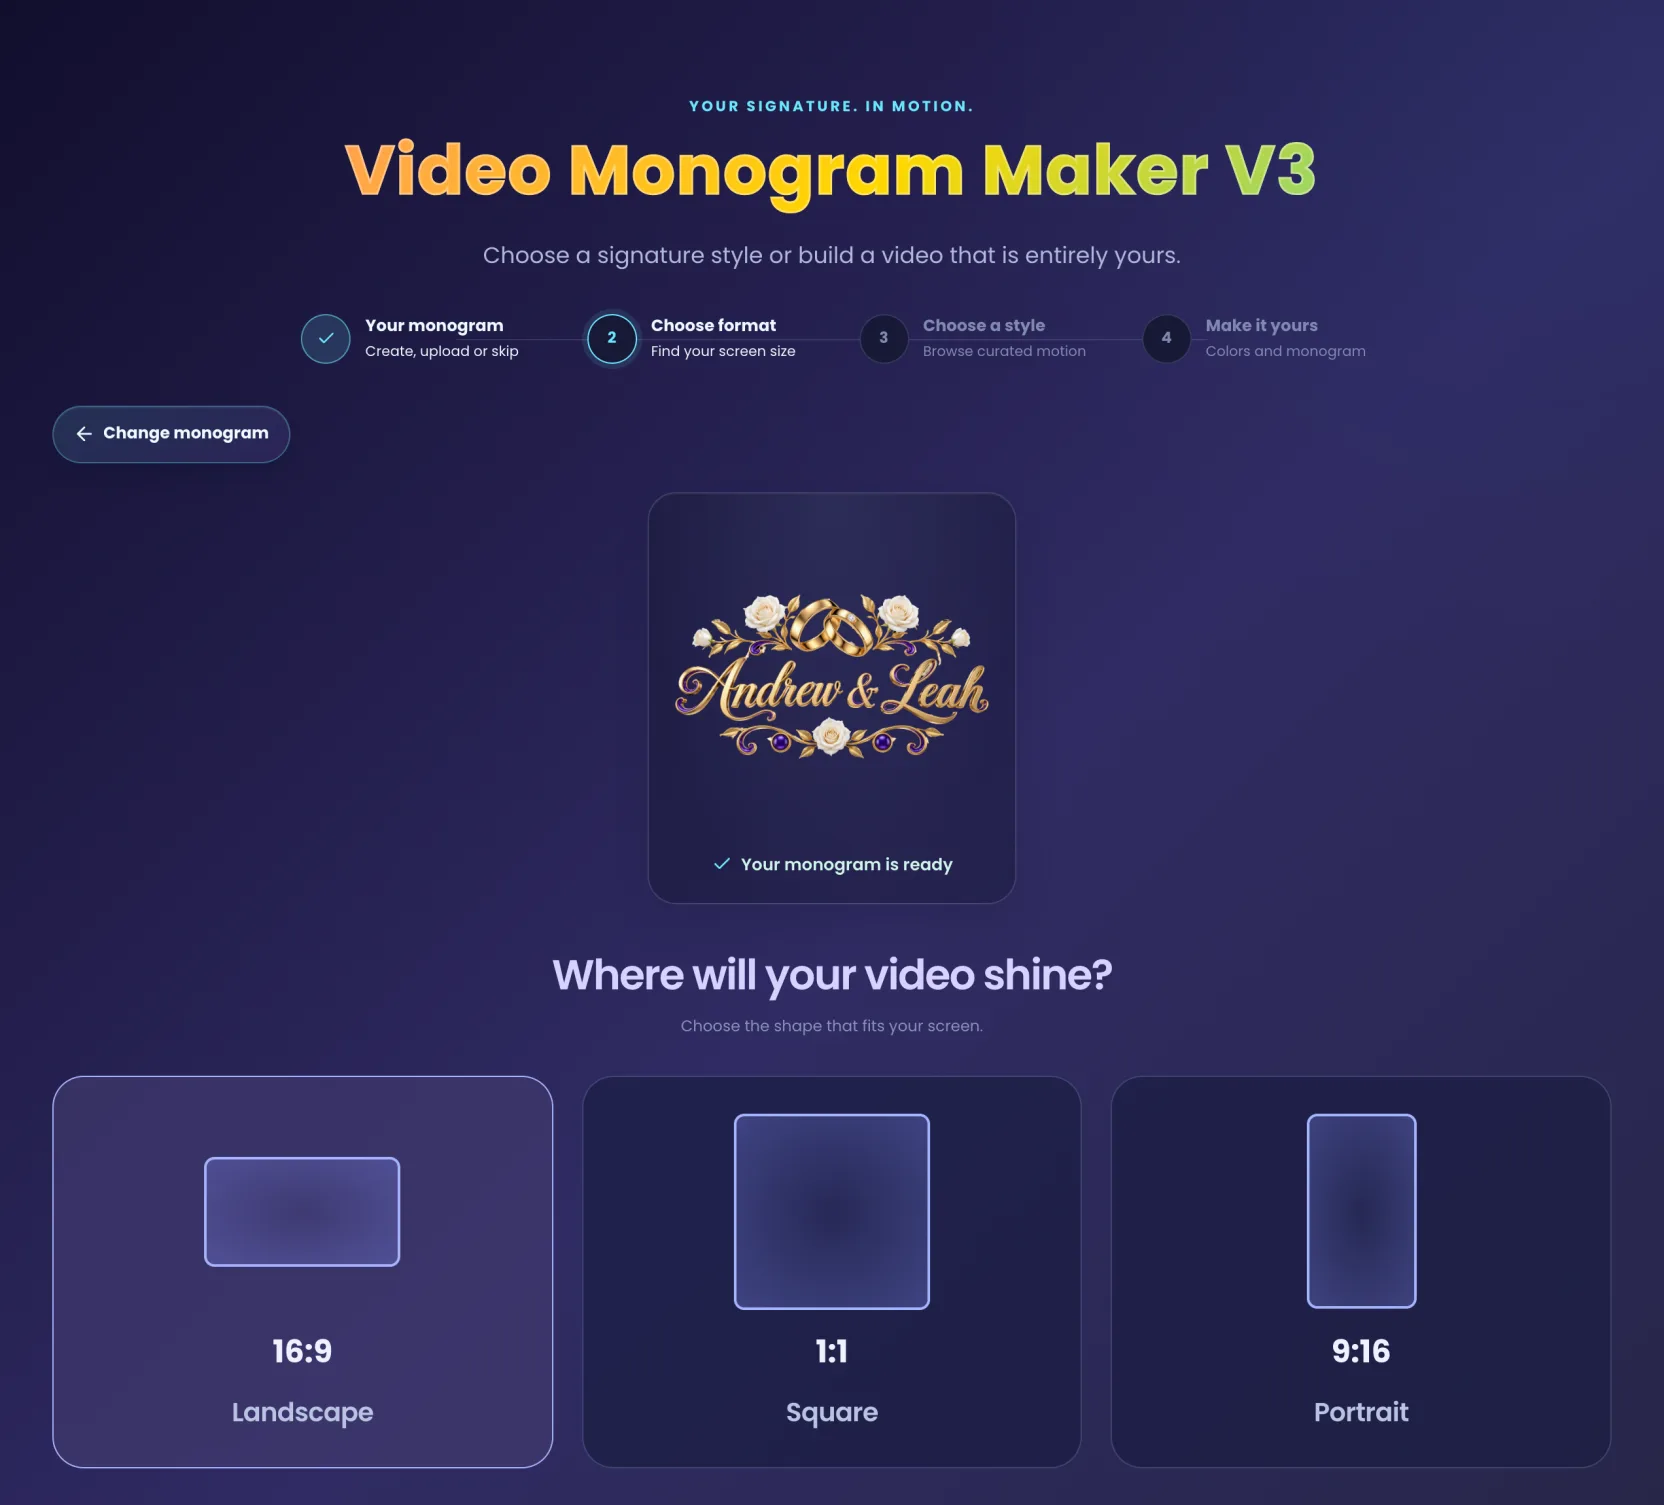
Where will your video shine? Three shapes, and the answer is whichever one matches the screen — a loop made in the wrong shape gets letterboxed or cropped by whatever plays it.
Landscape, square or portrait
16:9 Landscape renders at 1920 × 1080 and is the one for projectors, TVs and LED walls. 1:1 Square renders at 1080 × 1080. 9:16 Portrait renders at 1080 × 1920, for vertical displays and the screens most photo booths use.
Each format has its own set of styles, composed for that shape rather than cropped from the landscape version. Change format at the top of the gallery brings you back here, and what you had designed in another format is still there if you return to it during the same visit.
Step 3: pick a style
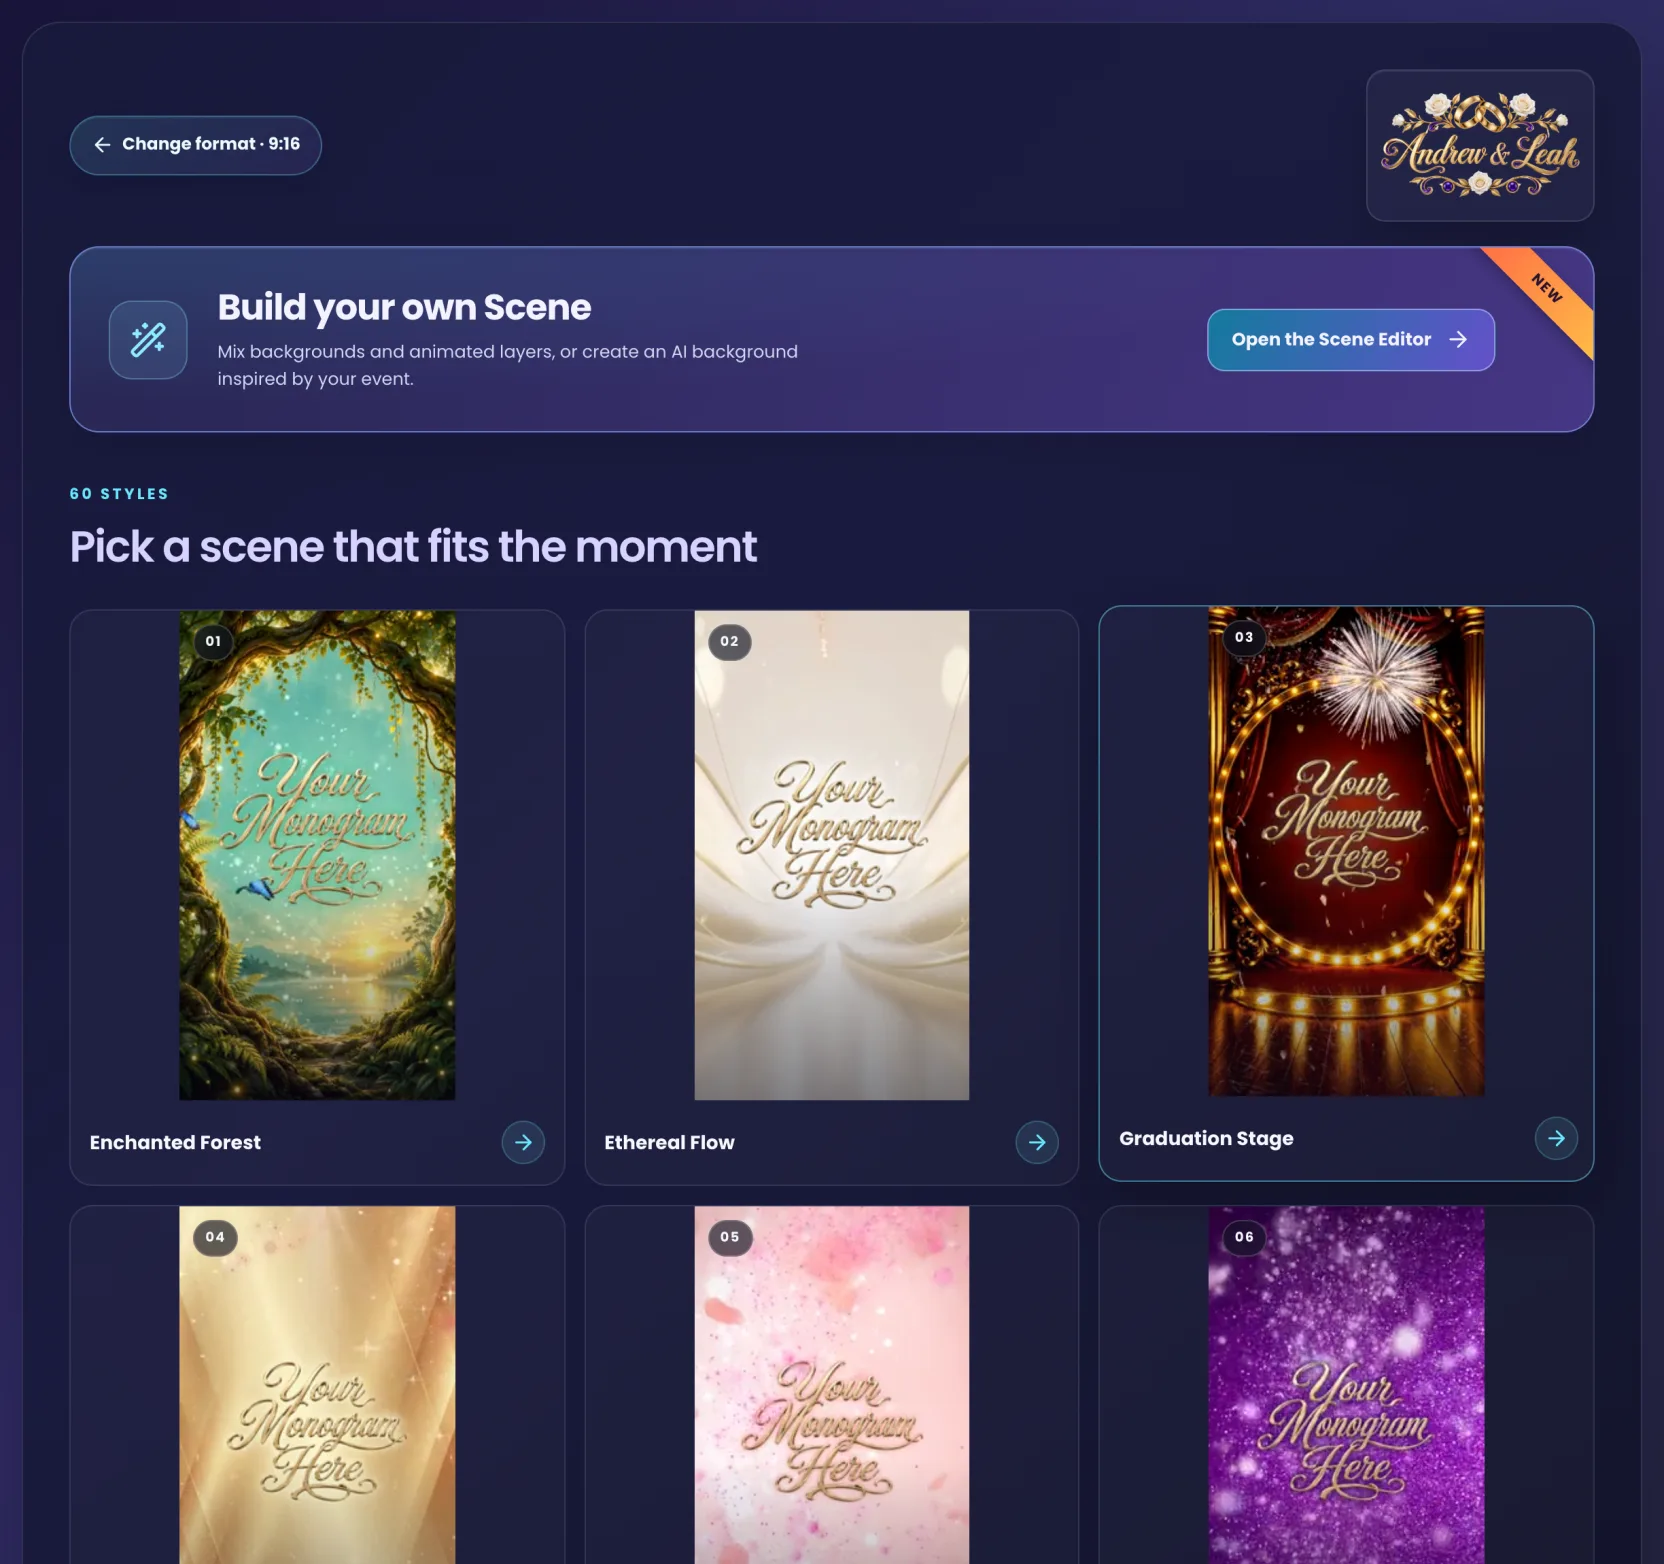
Sixty ready-made styles for the format you chose, six to a page — and above them, Build your own Scene for when you would rather assemble the scene yourself.
Browse the gallery
The cards run six at a time; Previous and Next walk through the ten pages, and the counter under the grid tells you where you are. Each card is a short video playing on loop, so what you see is what the animation actually does. Your monogram sits in the top corner the whole time.
Enchanted Forest, Ethereal Flow, Graduation Stage — the names describe the scene, not the occasion, and plenty of them work well outside the event you would guess from the title.
Judge the movement, not the colour
Every colour in these previews is yours to change in the next step. The composition and the motion are not: how much is going on, where the empty space sits, whether the light drifts or pulses.
Let each preview run a full cycle before deciding. An animation that looks striking for two seconds can be exhausting on a loop for six hours.
Step 4: make it yours
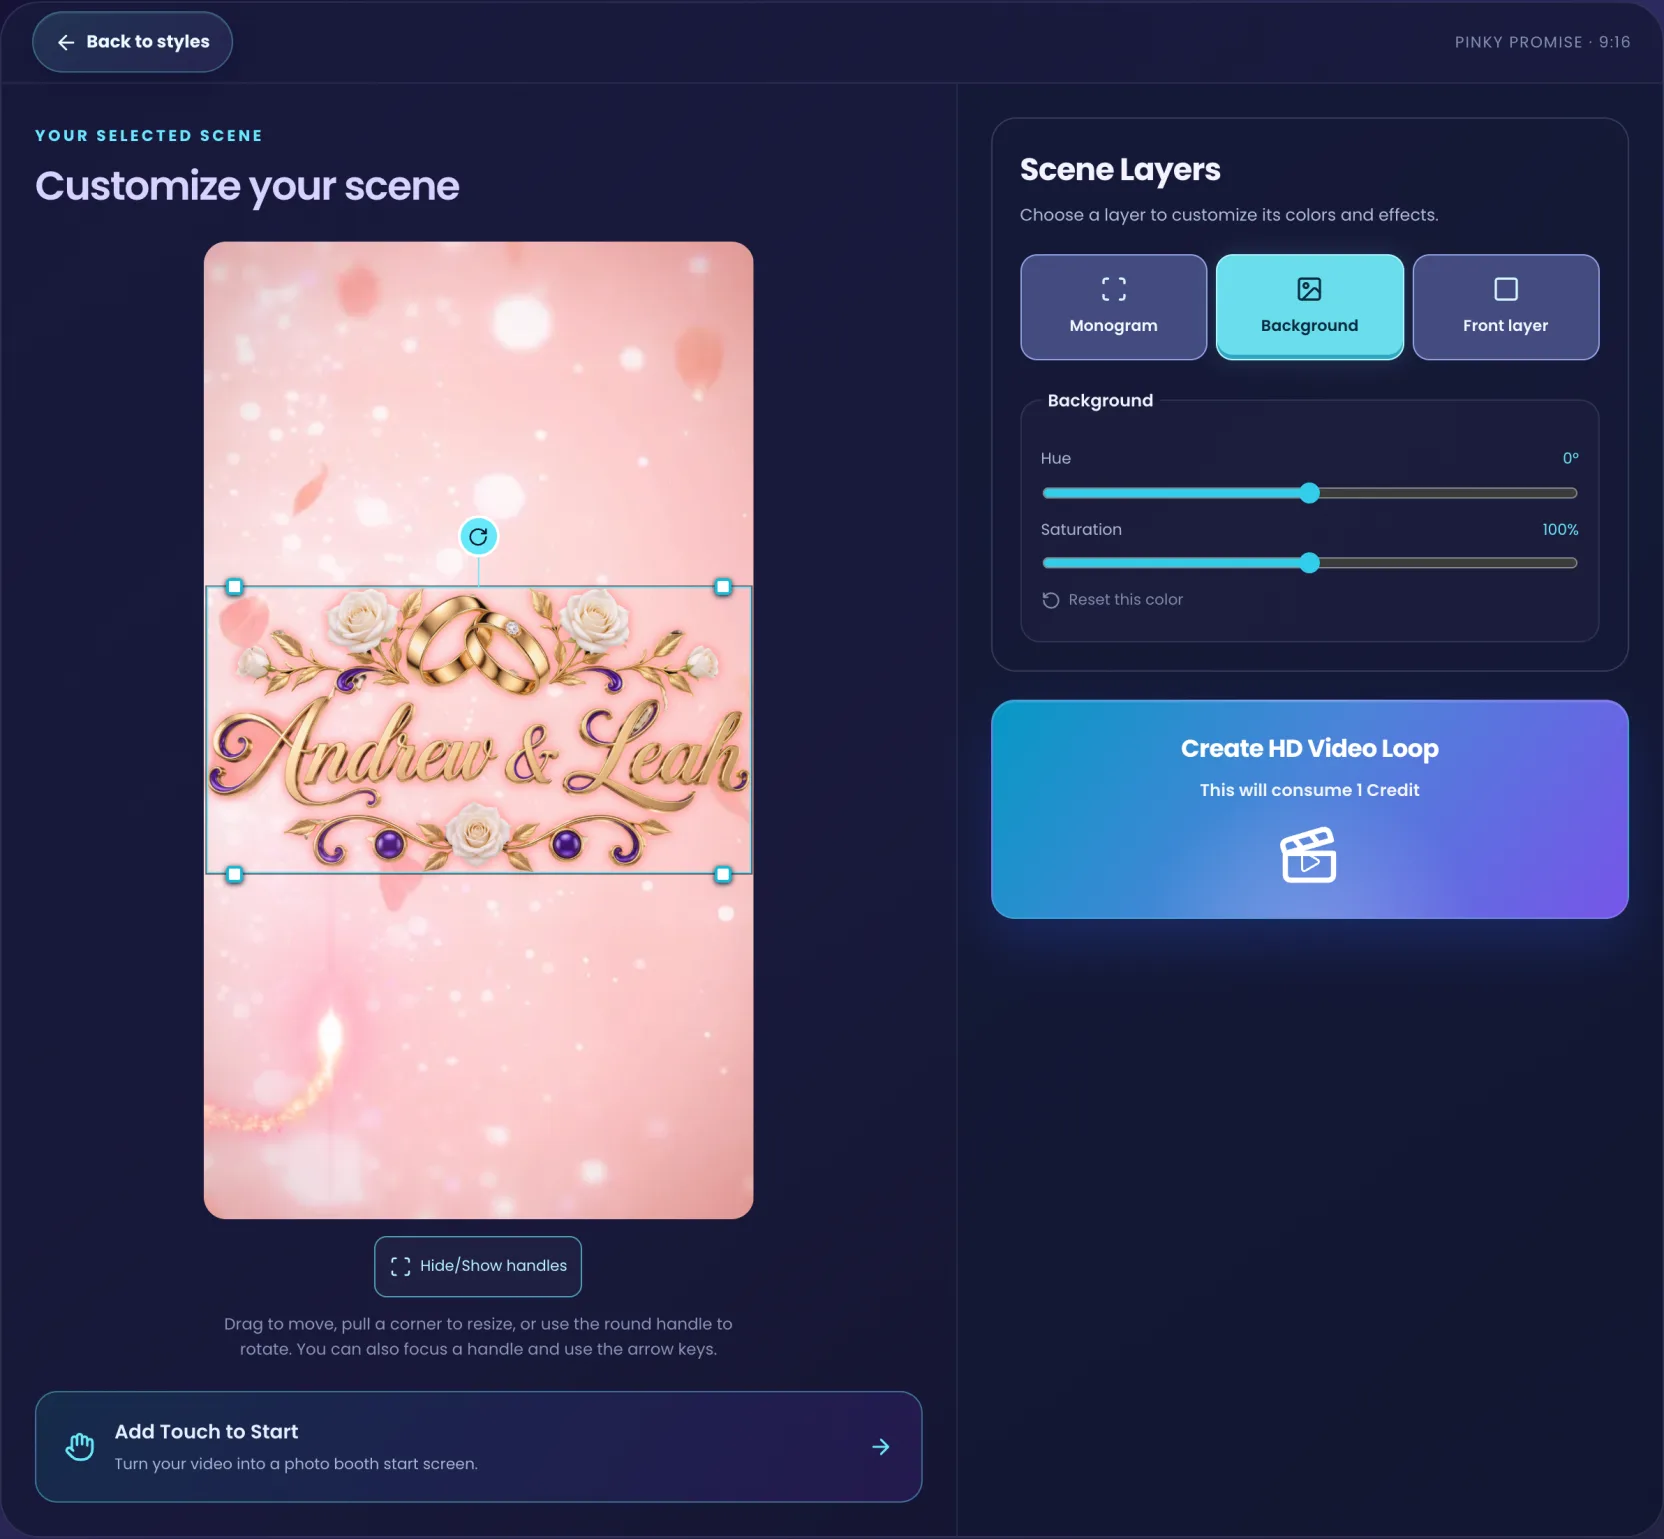
Picking a style opens the Scene Editor: a live preview that composes your real monogram over the real scene, and Scene Layers beside it. Everything here is free to play with; only the render button costs anything.
Colour each layer of the scene
Scene Layers is a row of tabs — Monogram, Background, and the Back layer and Front layer when the style has them. Pick one and its controls appear underneath. Each layer has its own Hue and Saturation, and they are independent on purpose: you can push the background towards blue while the petals in front stay pink.
Reset this color puts a single layer back to how the style shipped, without disturbing the others. A ready-made style keeps its own background and animations — you recolour them, you do not swap them. Swapping is what Build your own Scene is for.
Place and finish the monogram
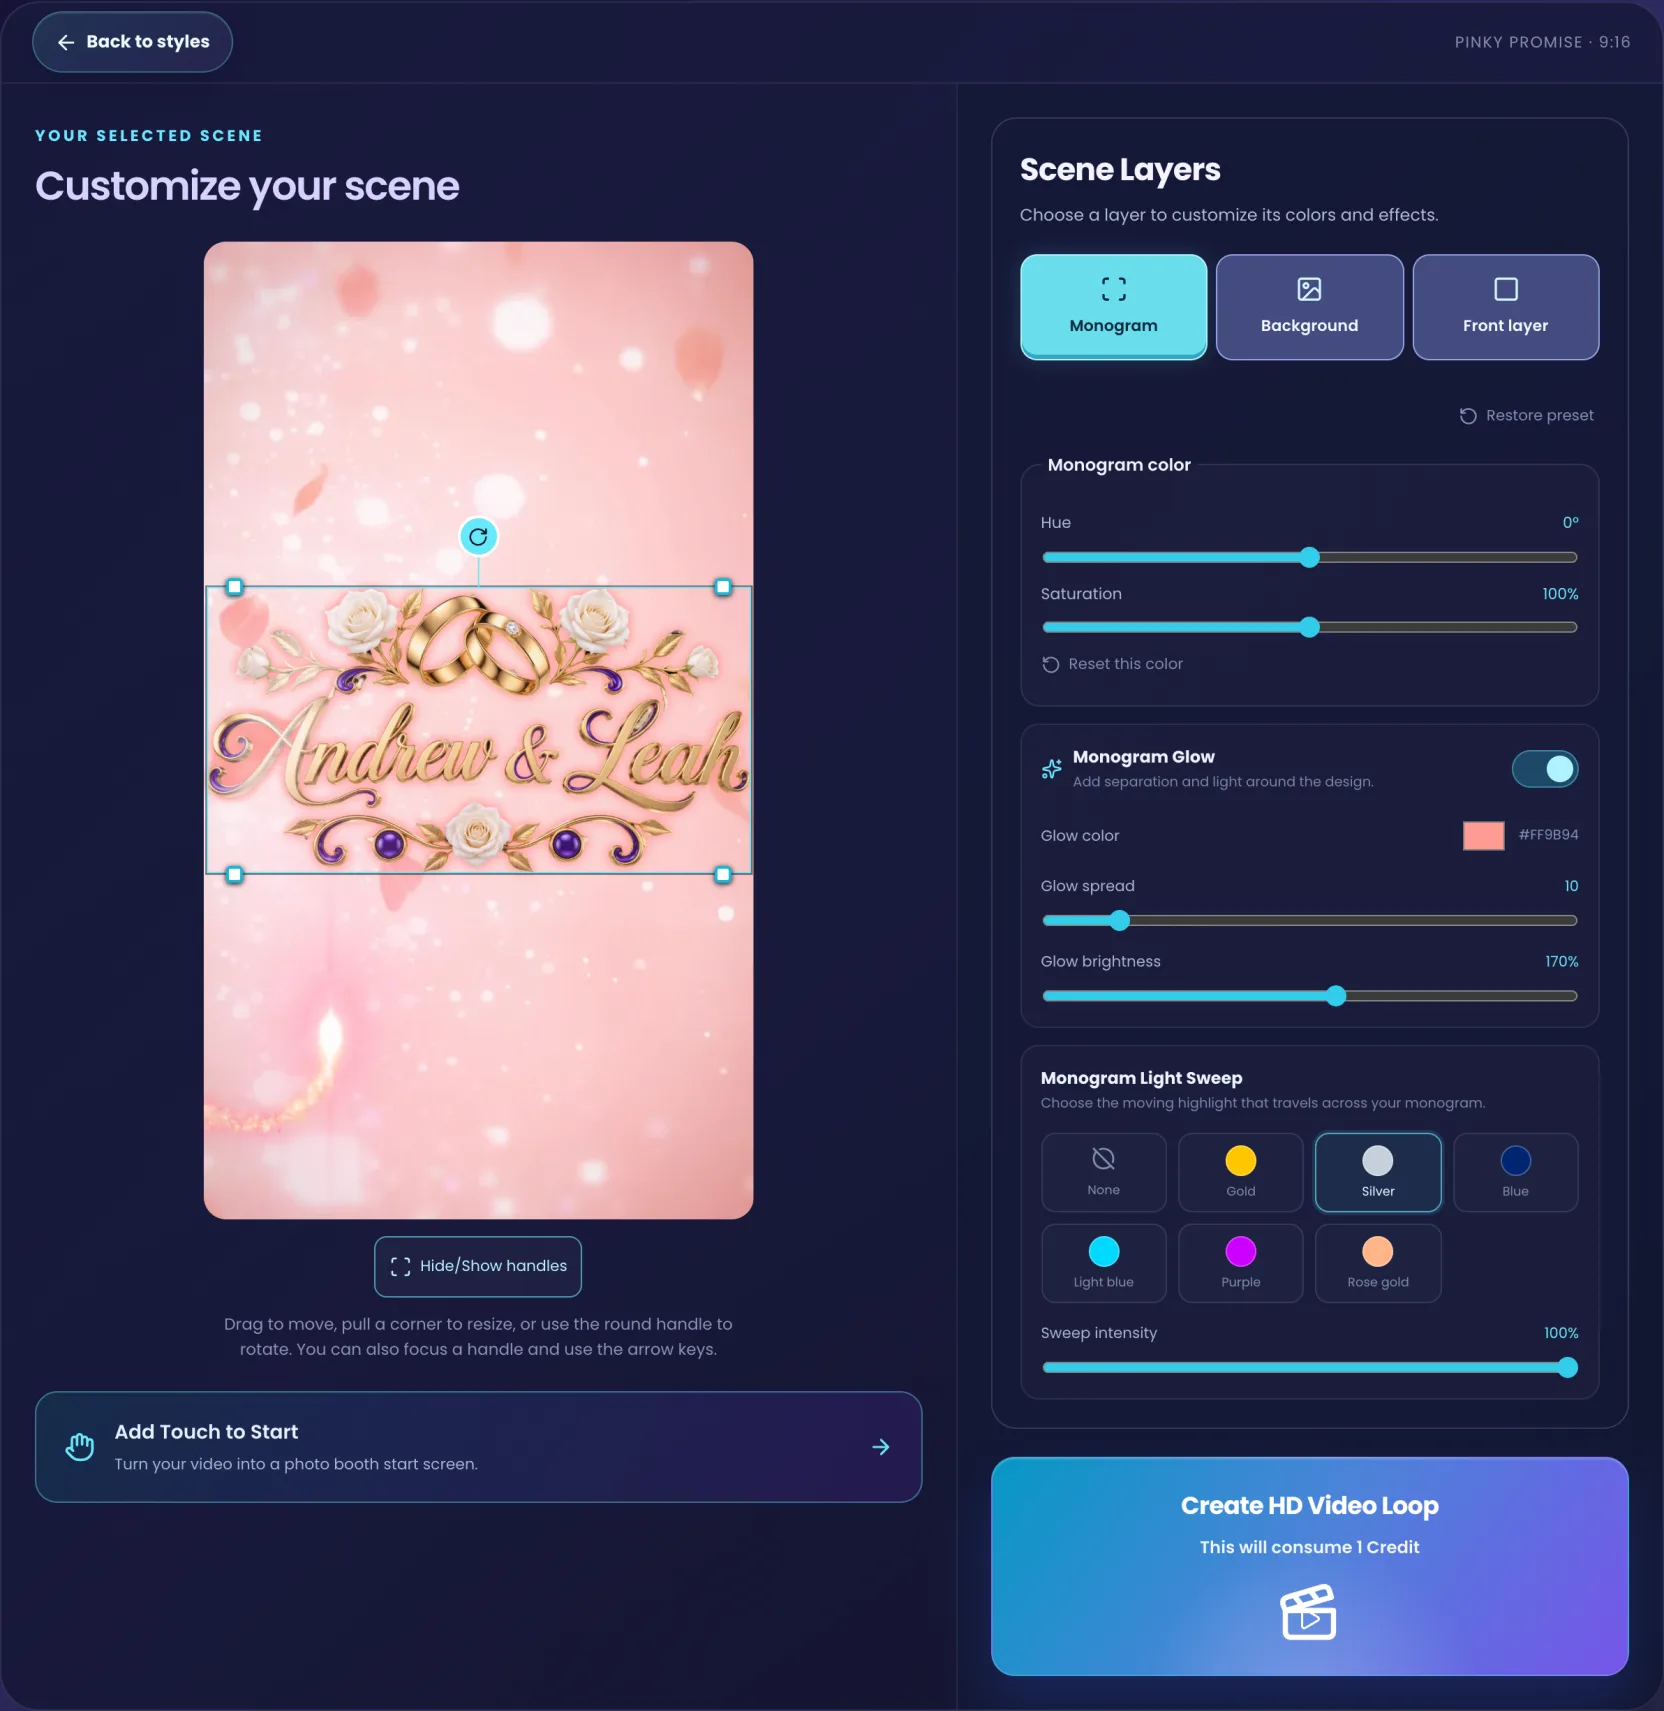
The monogram is edited right on the preview: drag it to move it, pull a corner to resize it, and use the round handle above it to rotate. The handles also work from the keyboard, and Hide/Show handles gets them out of the way when you want to see the composition clean.
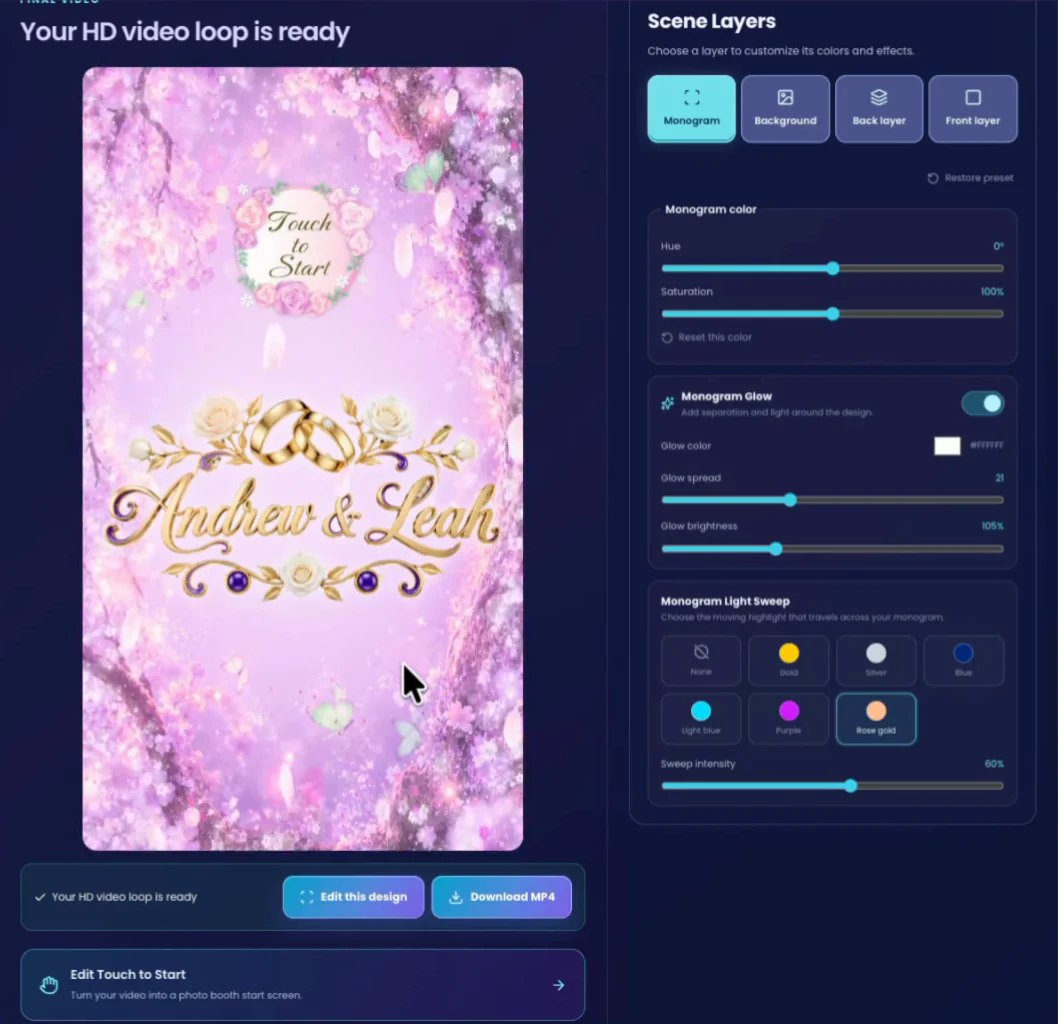
The Monogram tab holds the rest. Monogram color shifts the hue and saturation of the artwork itself. Monogram Glow puts light behind the lettering — colour, spread and brightness — and it is the single most useful control when a busy scene is swallowing the artwork. Monogram Light Sweep is the highlight that travels across the monogram; pick a colour or turn it off, then set the intensity.
Restore preset puts the monogram back to the style's own values if you lose your way.
Build your own Scene
The card at the top of the gallery, Open the Scene Editor, starts from an empty composition instead of a finished style. Same editor, same tabs — but now every layer is yours to choose.
Choose a background and the animated layers
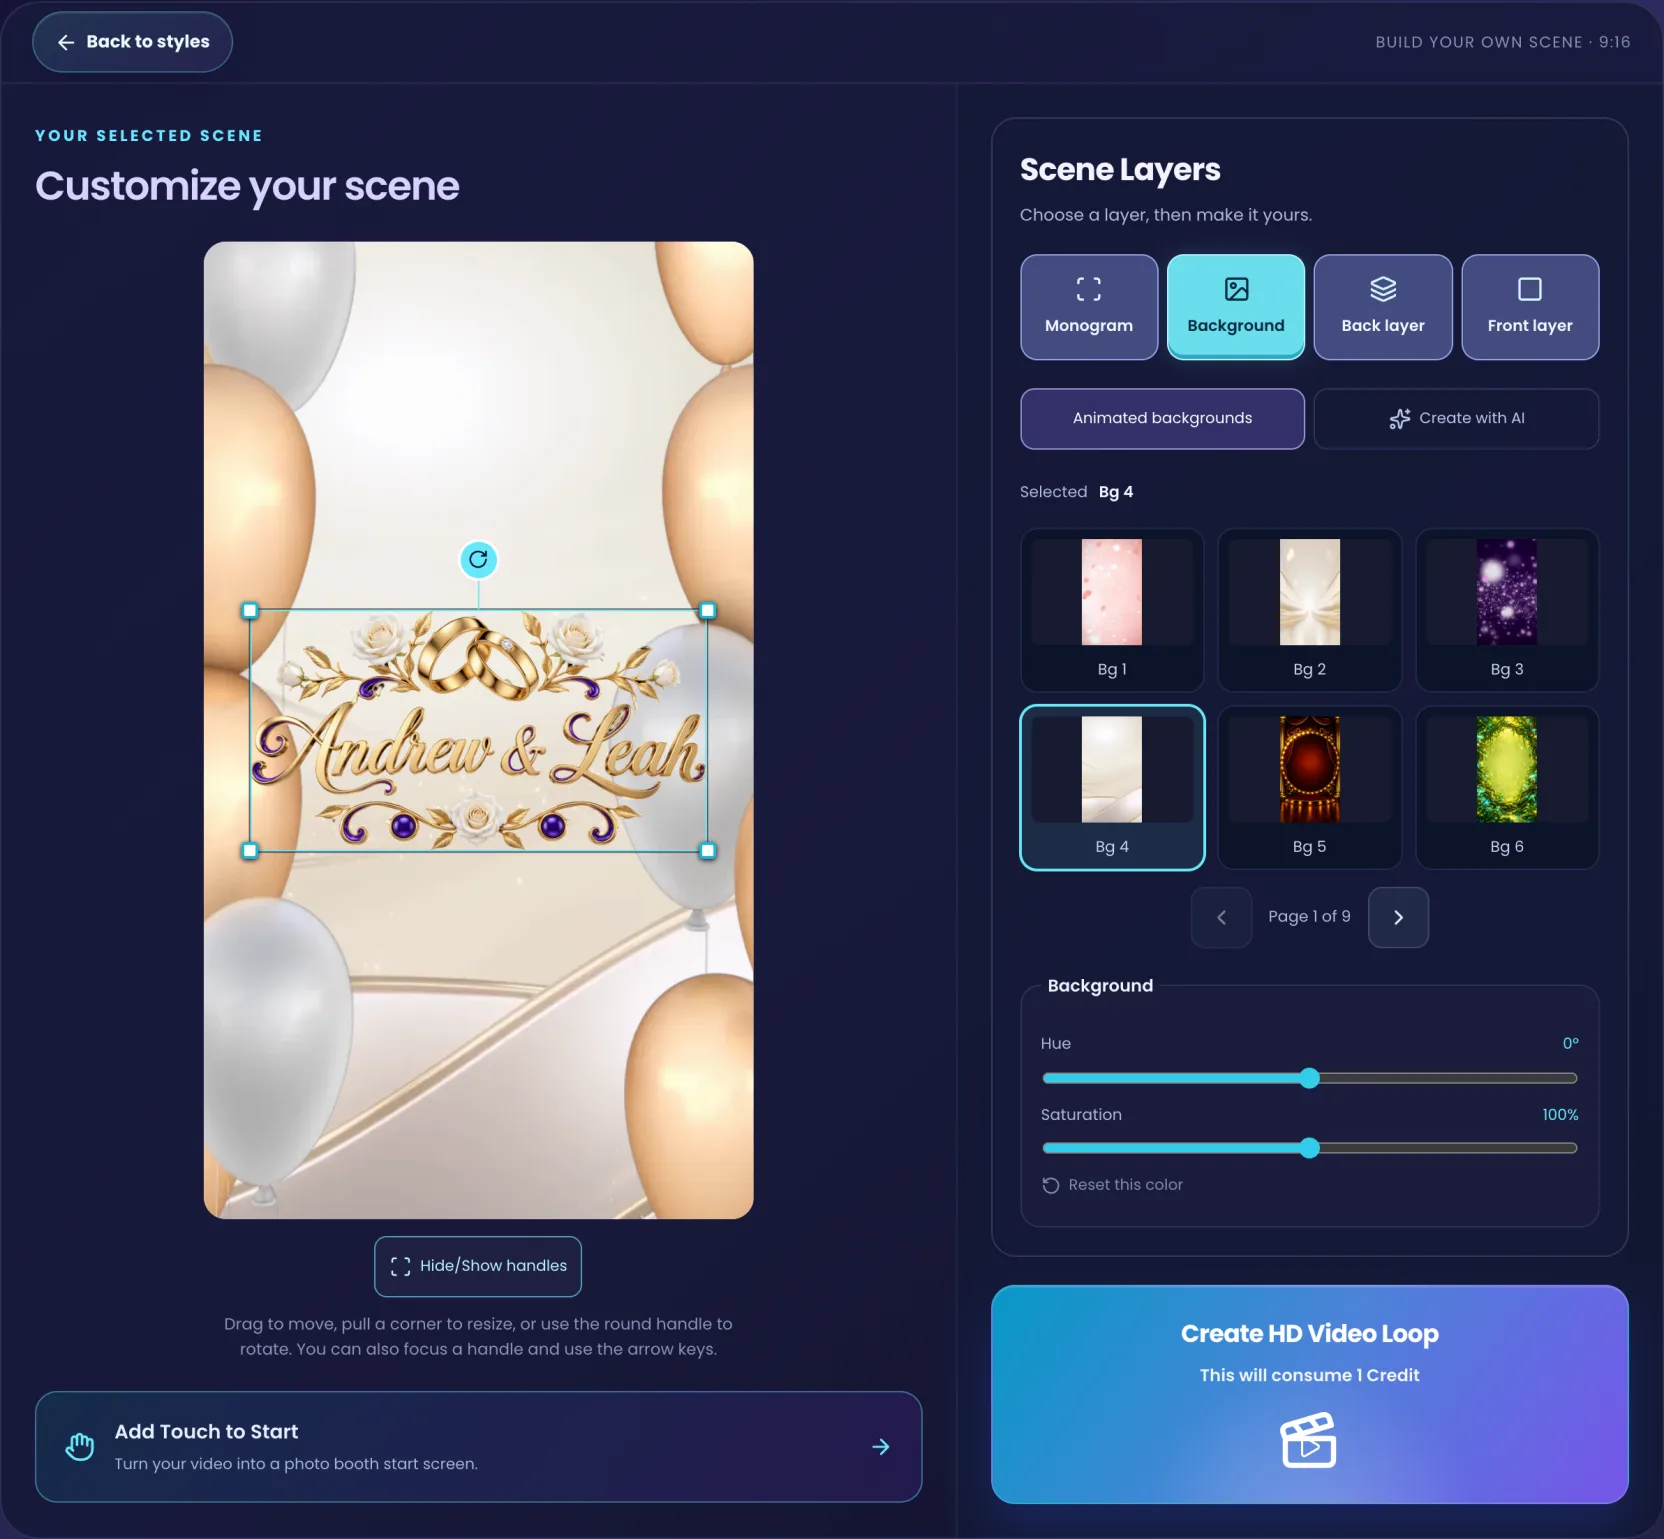
On the Background tab, Animated backgrounds is the catalogue: fifty-two moving backgrounds, six to a page. The Back layer sits behind the monogram and the Front layer in front of it — petals, sparkles, butterflies, light — and each one is optional: Remove takes it back to none.
Every layer you add gets the same Hue and Saturation controls as in a ready-made style, so a scene assembled from three unrelated pieces can still end up in one palette.
Or create the background with AI
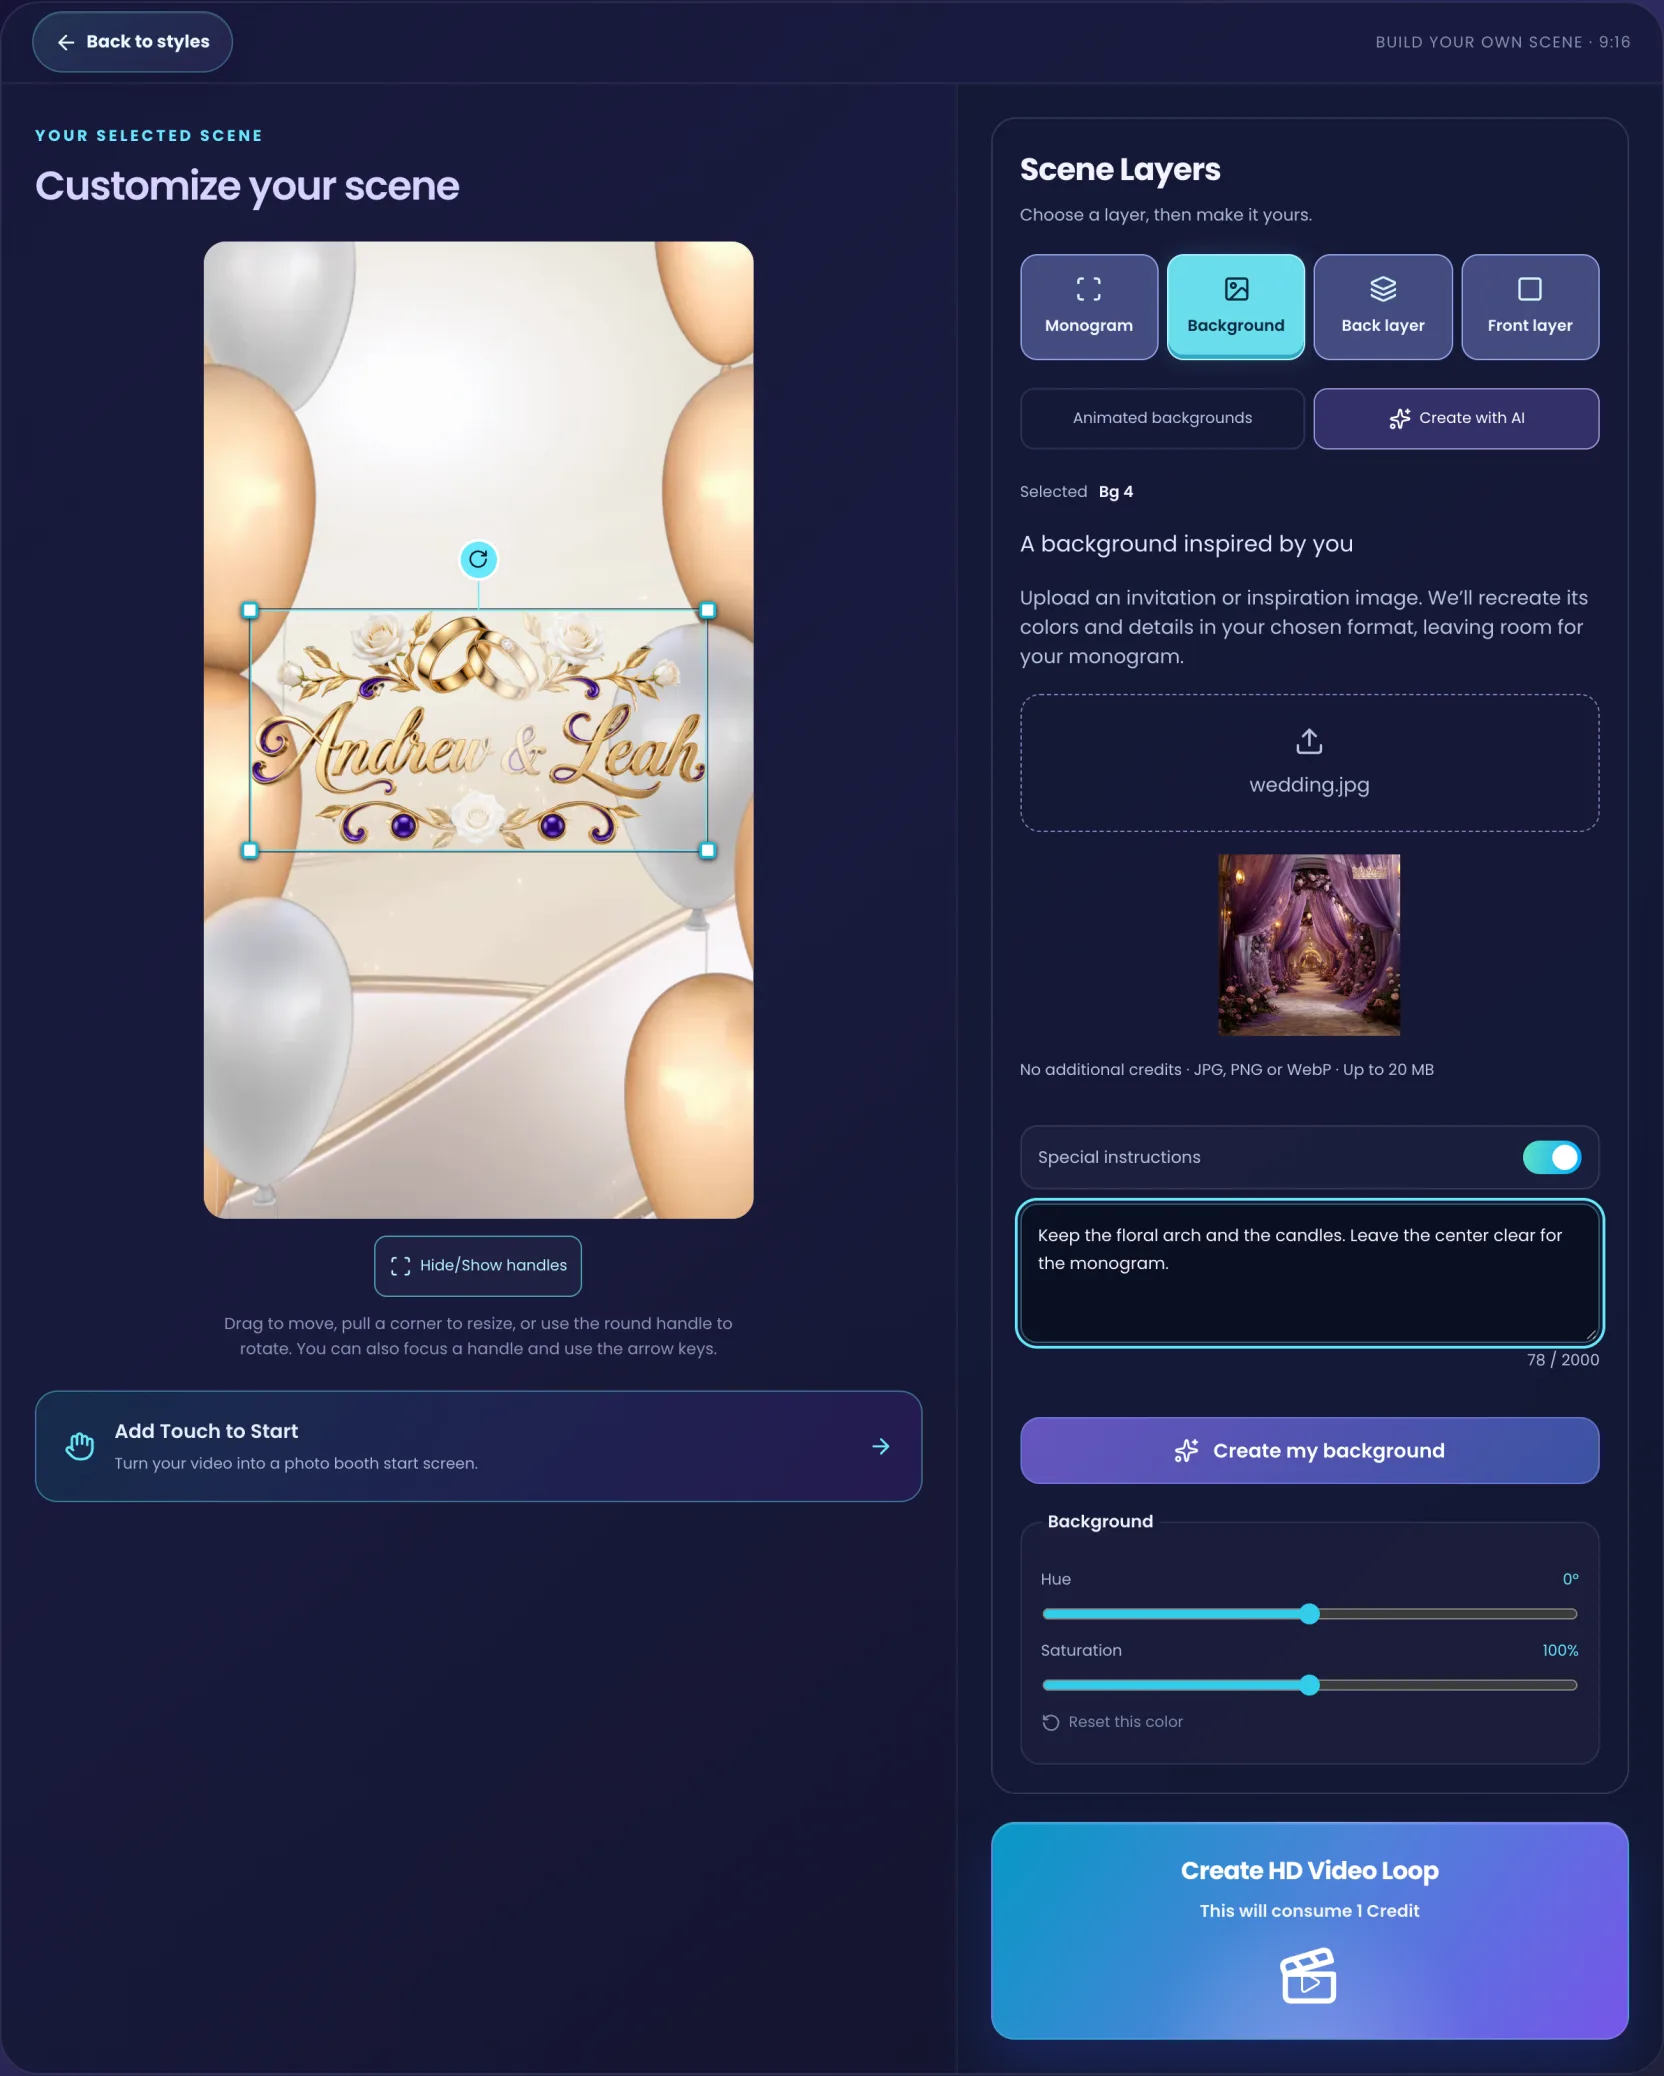
Create with AI builds a background from an image of yours. Choose an inspiration image — an invitation, a photo of the venue, the template you already designed; JPG, PNG or WebP up to 20 MB — and the tool recreates its colours and details in your chosen format, leaving room for the monogram.
Switch on Special instructions to say what to keep, change or leave out, then press Create my background. When it is ready it is applied to the scene by itself. Creating one, and creating another if you do not like the first, costs no additional credits.
Two things to know. The result is a still image — the movement comes from the Back and Front layers you add on top. And a generated background is only kept for 24 hours, so render the video the same day you create it.
Touch to Start and the render
Two things are left, and they work the same in a ready-made style and in a scene of your own: an optional start-screen animation, and the render.
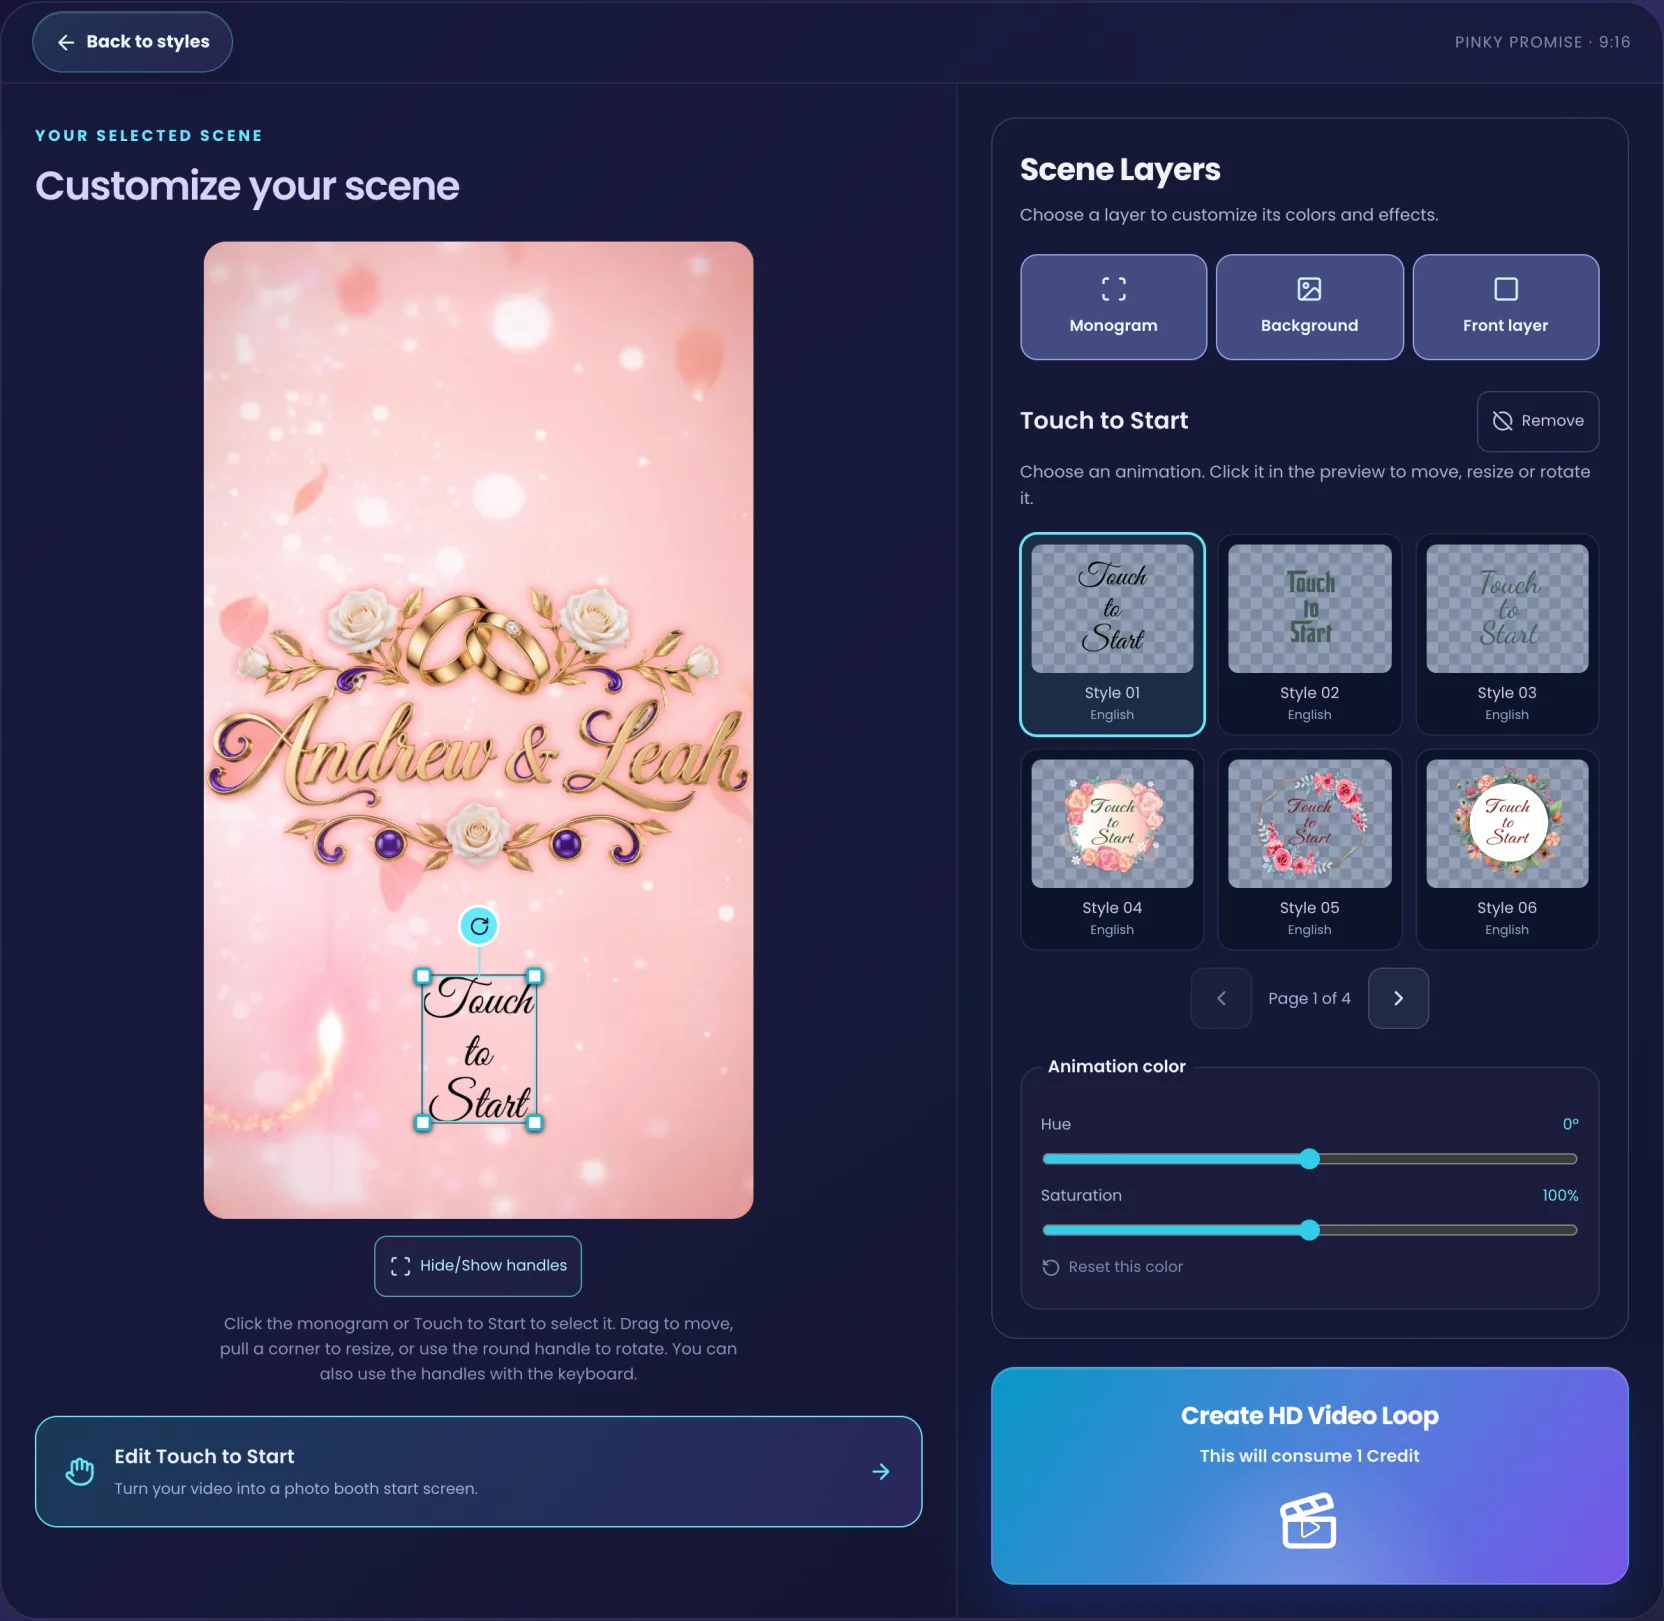
Add Touch to Start, if it is a start screen
Add Touch to Start, under the preview, turns the video into a photo booth start screen. Choose one of the 24 animations — most are in English, and the gallery labels the Spanish ones — and it lands on the preview, where you move, resize and rotate it with the same handles as the monogram. Animation color recolours it.
One Touch to Start at a time; picking another replaces it and Remove takes it off. It works with or without a monogram.
It is a graphic inside the video, not a button. The loop invites guests to touch; the touch itself is handled by your photo booth software, where you set the exported video as the welcome or start screen.
Render the HD loop
Create HD Video Loop is the step that spends the credit — one credit, as the button says. It usually takes between 55 and 90 seconds, with an estimated progress bar in place of the preview.
You do not have to babysit it. Reloading the page picks the render back up, and if you leave the tool the render still finishes and the video lands in your generation history. If the render fails or times out, the credit comes back.
What comes back plays in the same frame, on loop: a seamless twenty-second MP4 in the format you chose. Download MP4 saves it and Edit this design takes you back to the controls.
Getting better results
Choose the format for the screen, not for the preview
Ask the venue or check the booth before you start. A landscape loop on a vertical display ends up tiny between two black bars, and no amount of colour work fixes that.
Pick the style for its motion, its colours later
The thumbnail colours are a starting point, not a commitment — every layer is adjustable in the editor. What you cannot change in a ready-made style is where it leaves room for the monogram and how busy it gets, so choose on that.
Contrast beats matching
A gold monogram on a gold background disappears the moment the light in the animation moves across it. Pick a background that fights the artwork rather than agreeing with it — or add Glow, which does the same job from the other direction.
Give the AI background something clear to work from
An invitation with a defined palette and one or two recognisable motifs works better than a busy collage. Use Special instructions for the things a picture cannot say: what must stay, and what must not appear.
Keep Touch to Start away from the monogram
Put the monogram in the upper half and the animation below it, or the other way round. Stacked on top of each other, both become harder to read from across a room.
Want the still image too? Make it before you come here
Generating inside the video tool moves you straight on to the format step, so there is no Download PNG on the way past. If you also need the artwork for a printed sign, generate it in the monogram maker first, download it there, and then upload that PNG here.
Common mistakes
Reading the home card as "the video costs 2 credits"
It does not. The render is one credit; the other one pays for generating the monogram. Upload artwork you already own, or go without a monogram, and the whole run costs a single credit.
Trying to upload a JPEG as the monogram
The dropzone only takes PNG, and this is why: JPEG has no transparency, so whatever was behind your monogram would be baked in and would sit on top of the animation as a rectangle. Run it through the background remover first.
Uploading a PNG that is not actually transparent
A PNG exported with a white background is still a white background. It will be accepted, and it will compose as a white box. Check the file before you use it.
Expecting the Touch to Start animation to respond to touch
It is part of the picture. The video plays the invitation; the booth software listens for the touch and starts the session. Set the exported loop as the start screen there.
Coming back tomorrow to render an AI background
Generated backgrounds expire after 24 hours, and leaving the tool clears the design you were editing. Create the background and render in the same sitting; a new background is free if you need to start again.
Changing a colour after the video is rendered
Any edit re-arms the render button, because the MP4 you were looking at no longer matches the scene on screen. Download the file before you start experimenting again — a second render is a second credit.
Just need a still image?
If there is no screen at the venue, the animation is beside the point — a transparent monogram is a finished piece of artwork on its own, and it drops straight onto a photo booth template, a welcome sign or a printed backdrop.
The AI monogram maker builds one from a description or from an invitation you already have, and hands it to this same tool through Make it Video Loop whenever you decide you want it moving after all.
Open the AI monogram makerFrequently asked questions
What is a video monogram?
It is an animated version of an event monogram: the same names and artwork you would put on a welcome sign, rendered as a seamless HD loop so it can play on a projector, a TV, an LED wall or a photo booth screen for the length of the event.
How many credits does a video monogram cost?
The render costs 1 credit. Generating the monogram here, with AI or from the style library, costs 1 more, so a full run is 2 credits. If you upload a transparent PNG you already own, or make the video without a monogram, the whole thing costs 1 credit. AI backgrounds do not cost extra.
Do I need a monogram before I start?
No. The first step can create one with AI or design one from the style library, and you can upload your own transparent PNG if you already have artwork. You can also choose No monogram and make an animated scene or start screen without one.
What formats and resolutions can I export?
Three: landscape 16:9 at 1920 × 1080, square 1:1 at 1080 × 1080 and portrait 9:16 at 1080 × 1920. Each one is a twenty-second MP4 that loops seamlessly.
Why does my monogram need a transparent background?
The animation plays behind and around the artwork. If the file carries its own background it shows up as a solid rectangle sitting on top of the animation, which is why the upload step accepts PNG only and why the video tool never offers the black projector version of a monogram.
Can I use my own background?
Yes, through Build your own Scene. Upload an invitation or any inspiration image and Create with AI generates a background in its style, in the format you chose, at no additional credit cost. The background is a still image; the animated layers you add supply the movement.
Does Touch to Start make the video interactive?
No. Touch to Start is an animated graphic inside the video that invites guests to touch the screen. The touch itself is handled by your photo booth software, where you set the exported video as the welcome or start screen.
How long does the render take?
Usually between 55 and 90 seconds. You can reload the page without losing it, and if you leave the tool the render still finishes and the video appears in your generation history. If the render fails or times out, the credit is returned.
Can I change the colours after the video is rendered?
Yes, but the rendered file will not change with them. Any edit enables the render button again, and a second render costs another credit, so download the MP4 before you start experimenting.
Make your first loop
Bring a monogram, make one in the first step or go without, then spend your time in the style gallery and the Scene Editor — both are free. The render at the end is the easy part, and it is the only part that costs anything.