There is a moment every booth operator knows: the event is on Saturday, the client has sent three reference images and a colour, and what you actually need is one design that works across a 2x6 strip, a mirror booth, a 360 square and a welcome screen. Designing that from nothing is an afternoon. Adjusting something that already works is fifteen minutes.
That is what the Template Designer is for. It is a library of finished themes with the changeable parts exposed — frame colours, curtains, flowers, background, the monogram — and a live preview that updates as you touch them. No AI, no prompt, no surprises: the same choices produce the same design every time, which is exactly what you want when a client has already approved a look.
Before you start
- The occasionThemes are filed by event — Quince / Sweet 16, Wedding, Graduation, Corporate, Party, Western / Rustic, Elegant, Themed, Floral, Holiday, Birthday and Sports. Knowing which one you are in cuts nine pages of themes down to a handful.
- The names and the dateThe text that goes on the monogram — "Laura's Quince", "Emma & Noah" — and the event date if you want it printed. Both are typed in, not designed.
- A rough colour directionNot a hex code. The customization step offers named colours per theme, so "gold frames and sage curtains" is a more useful thing to arrive with than a swatch.
- A free accountGenerating uses one credit. New accounts start with enough to run this end to end, and trial downloads carry a watermark until you move to a paid plan.
The six steps
The wizard counts them across the top: Theme, Customize, Personalize, Monogram, Customize Mono, Layouts. Only the last one costs anything, and you can go backwards at any point with Previous.
Pick a theme
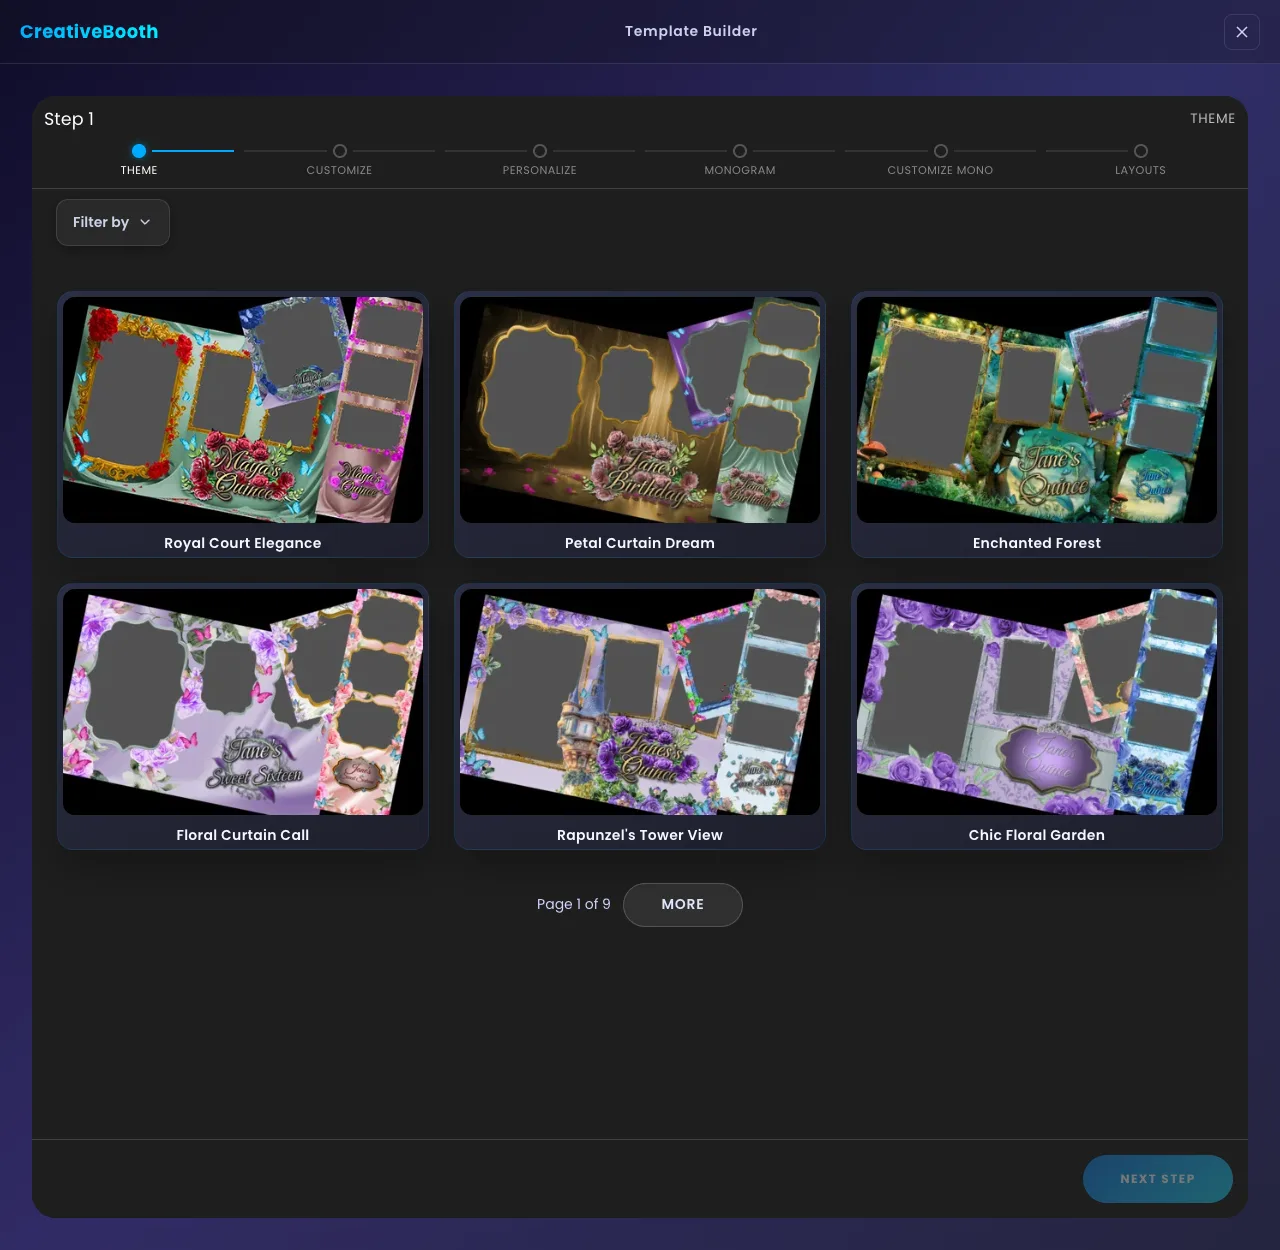
Six themes to a page, nine pages, each card a finished design rather than a blank layout. Filter by narrows the grid to an occasion and More walks through the pages.
The walkthrough uses Royal Court Elegance. Choose on composition, not colour: where the photo slots sit, how many there are, whether the artwork frames them or sits beside them. The colours are yours to change in the next step; the arrangement is not.
Nothing on this page is quite what the client asked for? Request a Theme takes a description and an example image, and new layouts usually land within a couple of days.
Change the parts you care about
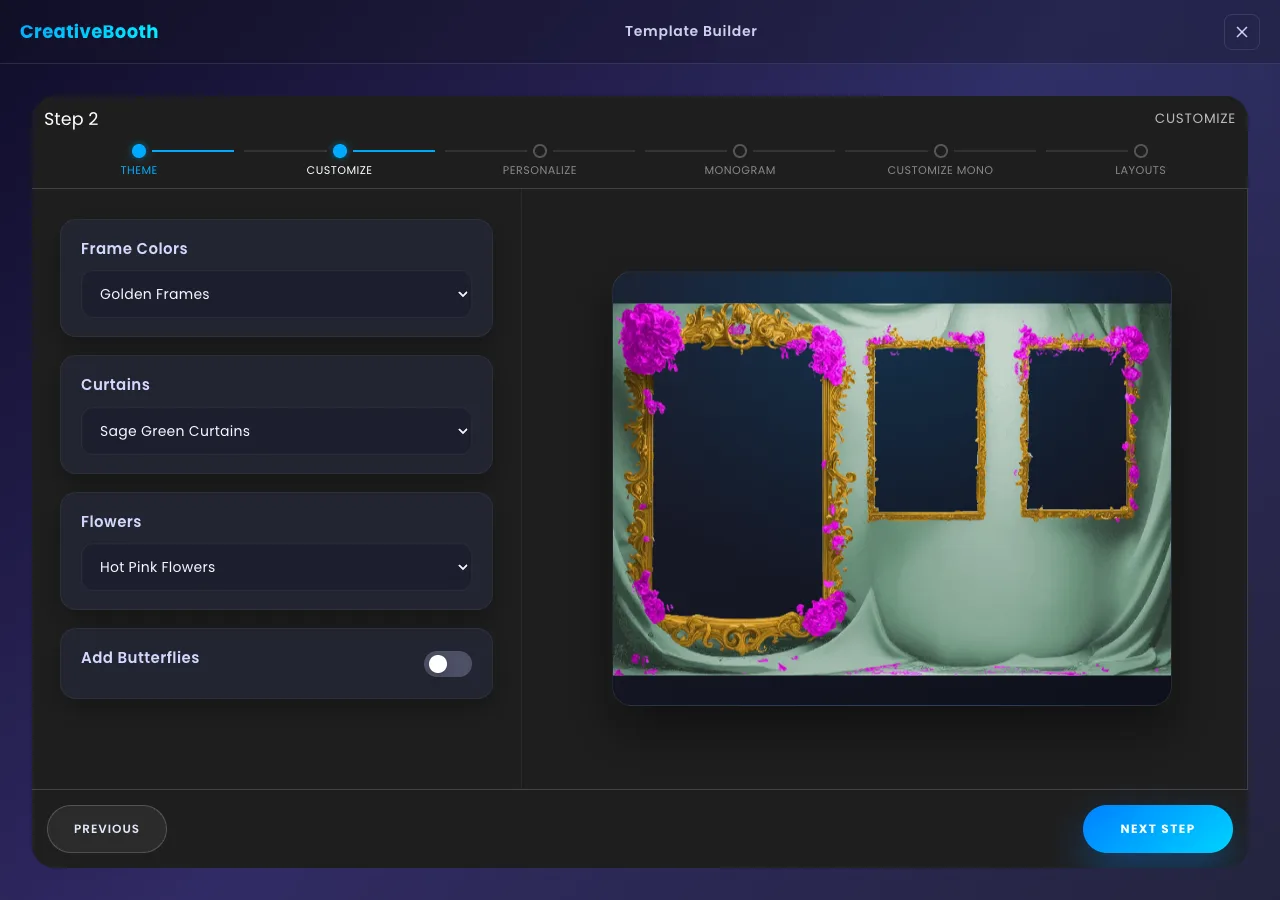
This is the screen that makes the tool worth using. The preview on the left is the actual template, built in layers, and it redraws as you change each dropdown on the right.
The options are the theme's own parts, so they differ from theme to theme: Frame Colors, Curtains and Flowers here, with an Add Butterflies switch. Other themes expose balloons, confetti, a flower wall, hearts, roses, sparkles, wood colour, a zodiac symbol, art deco panels or a seasonal banner.
Every value is a named colour rather than a picker. That sounds like a limitation and is the opposite of one: each named option is artwork that was drawn for this theme, so nothing you pick here can come out looking wrong.
Add the date and your branding
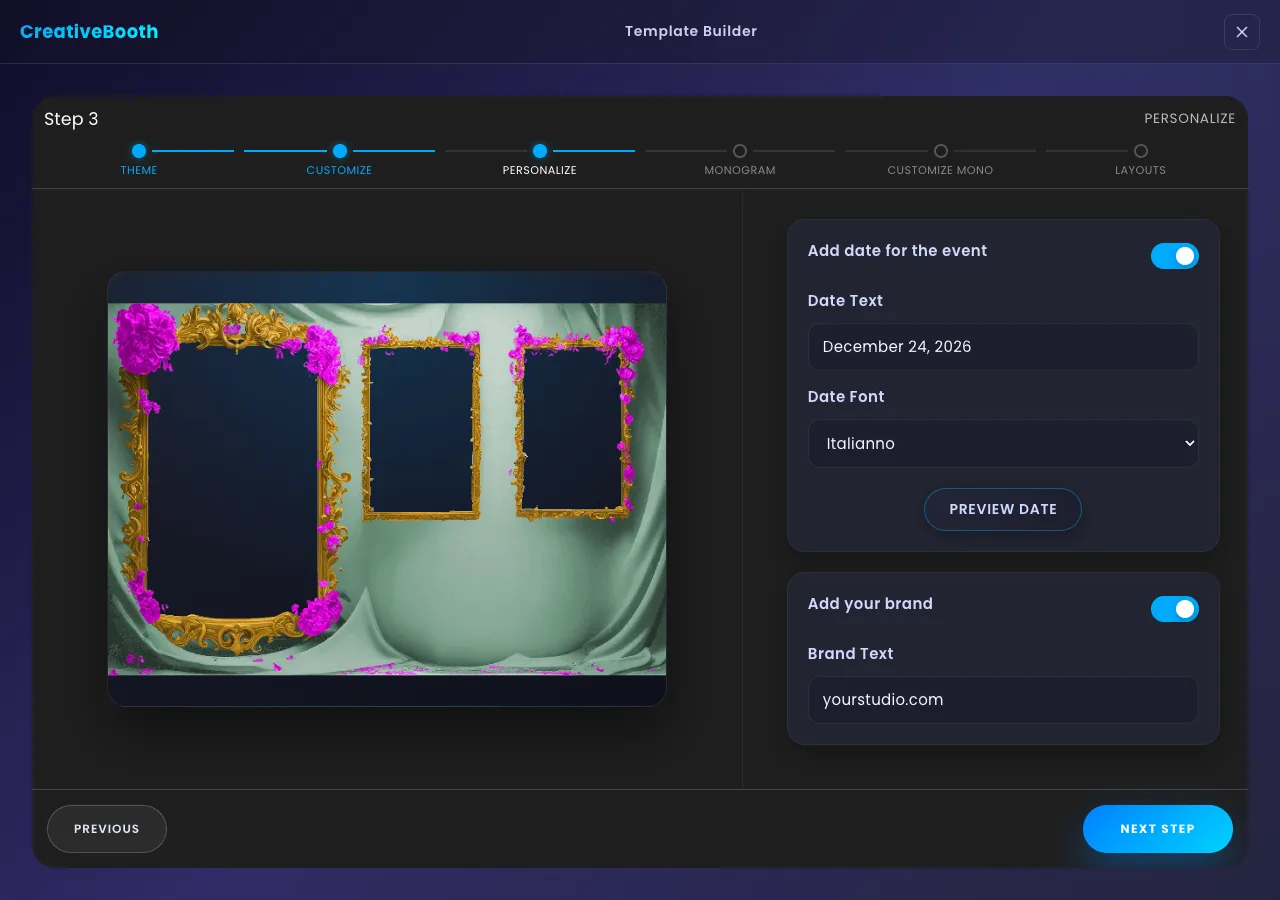
Two switches, both off by default. Add date for the event opens a Date Text field and a Date Font list — seven script faces, from Italianno to Waterfall — plus Preview Date, which draws it onto the template so you can see the font at its real size before committing.
Add your brand does the same for a Brand Text line: your studio name or website, set small and placed where it does not fight the design. It is the difference between a template that could be anyone's and one that is recognisably yours.
Both are optional and both are worth turning on. The date is what makes guests keep the print.
Decide where the monogram comes from
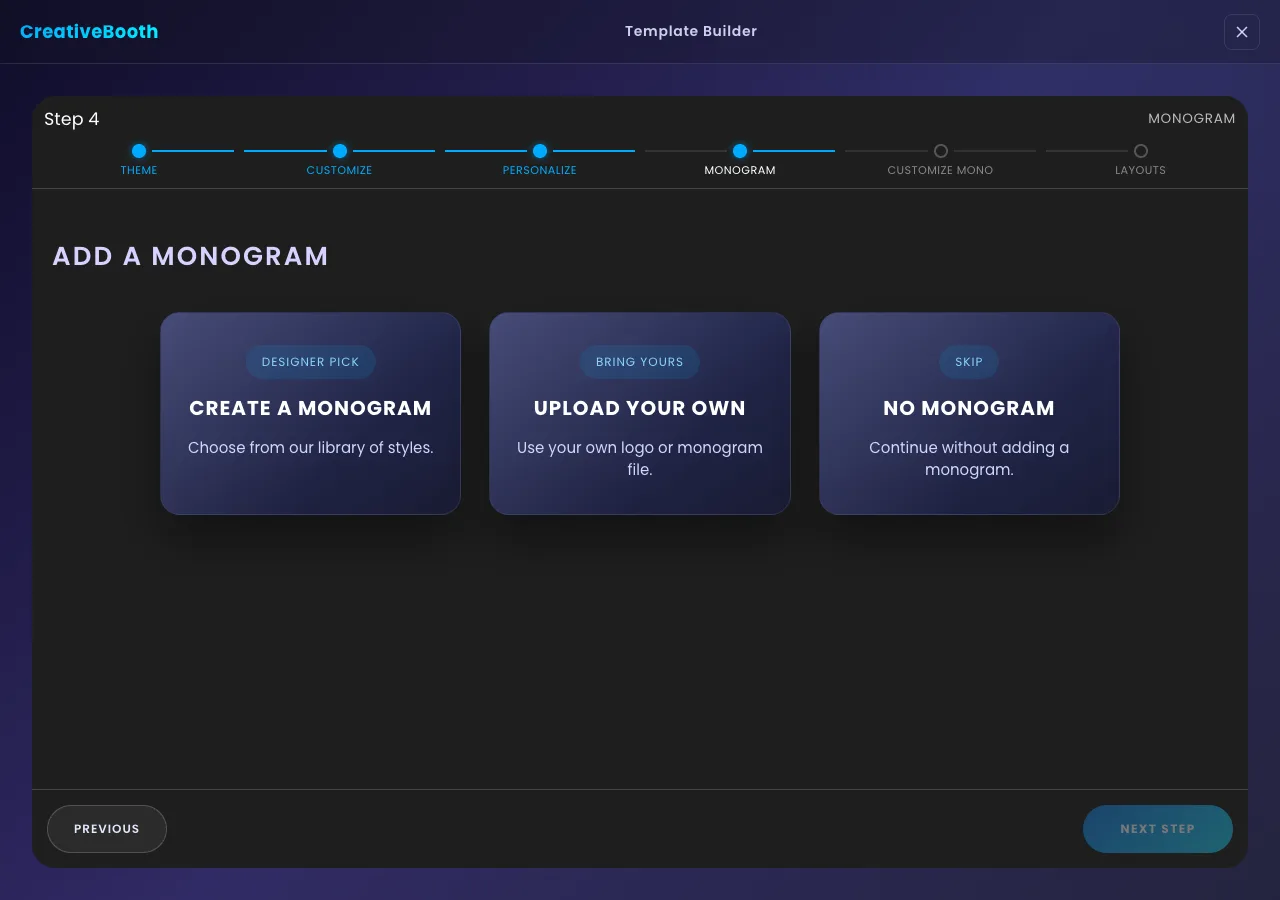
Three cards. Create a Monogram picks a design from the built-in library. Upload your own takes a logo or monogram file you already have. No Monogram skips it entirely and jumps straight to the layouts step.
Take the first one unless you have a reason not to. The monogram is what ties the template to this specific event, and it comes back as a separate file you can reuse on signage and the welcome screen.
One thing to know before you go back: changing your mind here clears the style and text you picked on the next step. Settle this before you spend time filling that form in.
Set up the monogram
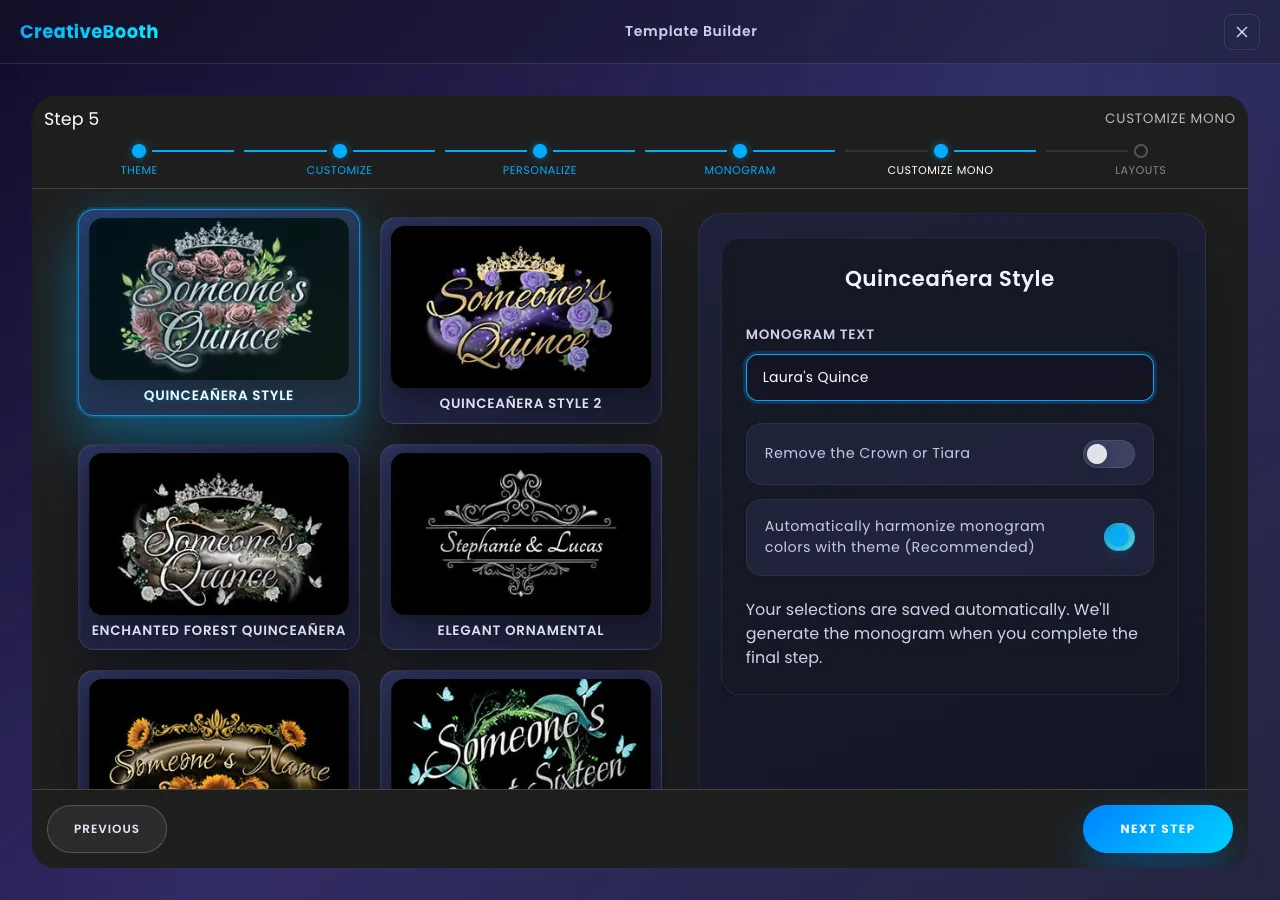
On the Create a Monogram route you get a gallery of styles — six to a page, five pages — and a form on the right that changes with the style you pick. Monogram Text is the constant; the rest are that design's own switches, like Remove the Crown or Tiara.
Leave Automatically harmonize monogram colors with theme on. It is on by default and it is the reason the monogram comes back looking like it belongs to the template rather than pasted on top of it.
Nothing renders yet, and the hint on screen says so: your selections are saved and the monogram is generated when you finish the final step. So there is no cost to trying a different style here.
Choose the layouts and generate
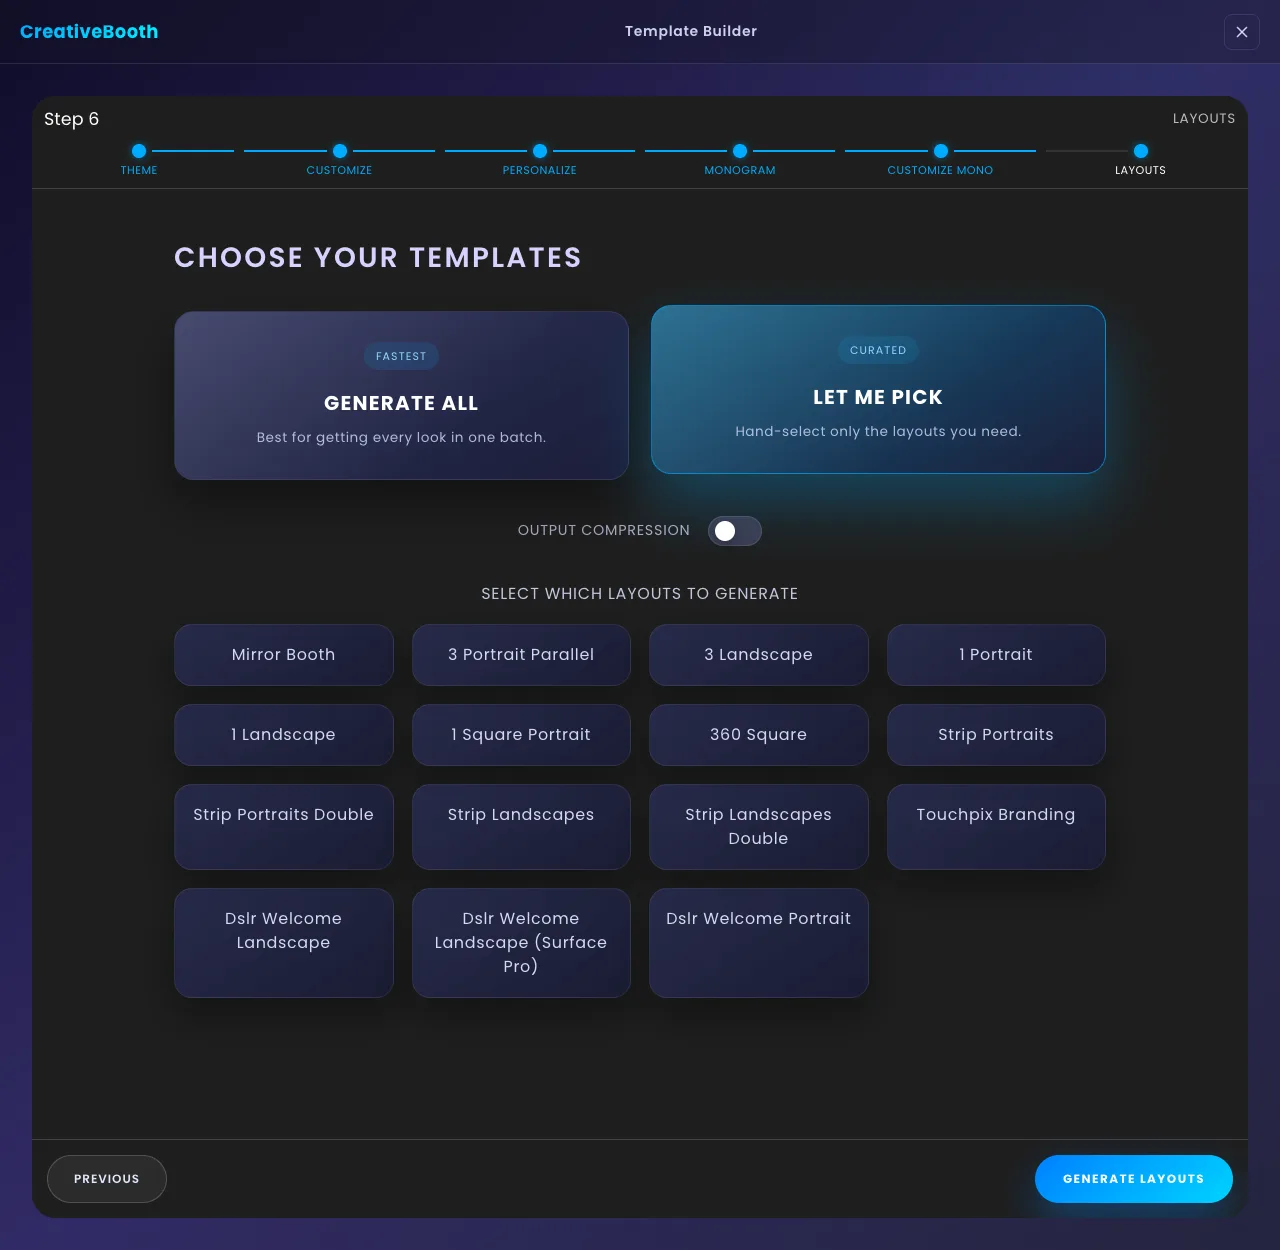
Generate All produces every layout in one batch. Let Me Pick opens a grid of fifteen and lets you hand-select — Mirror Booth, 3 Portrait Parallel, 3 Landscape, 1 Portrait, 1 Landscape, 1 Square Portrait, 360 Square, four strip variants, Touchpix Branding and three DSLR welcome screens.
Take Generate All. One run costs one credit whichever mode you are in, so picking three layouts costs exactly what picking sixteen costs — and the layout you did not think you needed is the one the venue asks for on the day.
The Output Compression switch trades file size against fidelity; leave it off unless your booth software is fussy about upload size. Then Generate Layouts spends the credit.
Collect the files
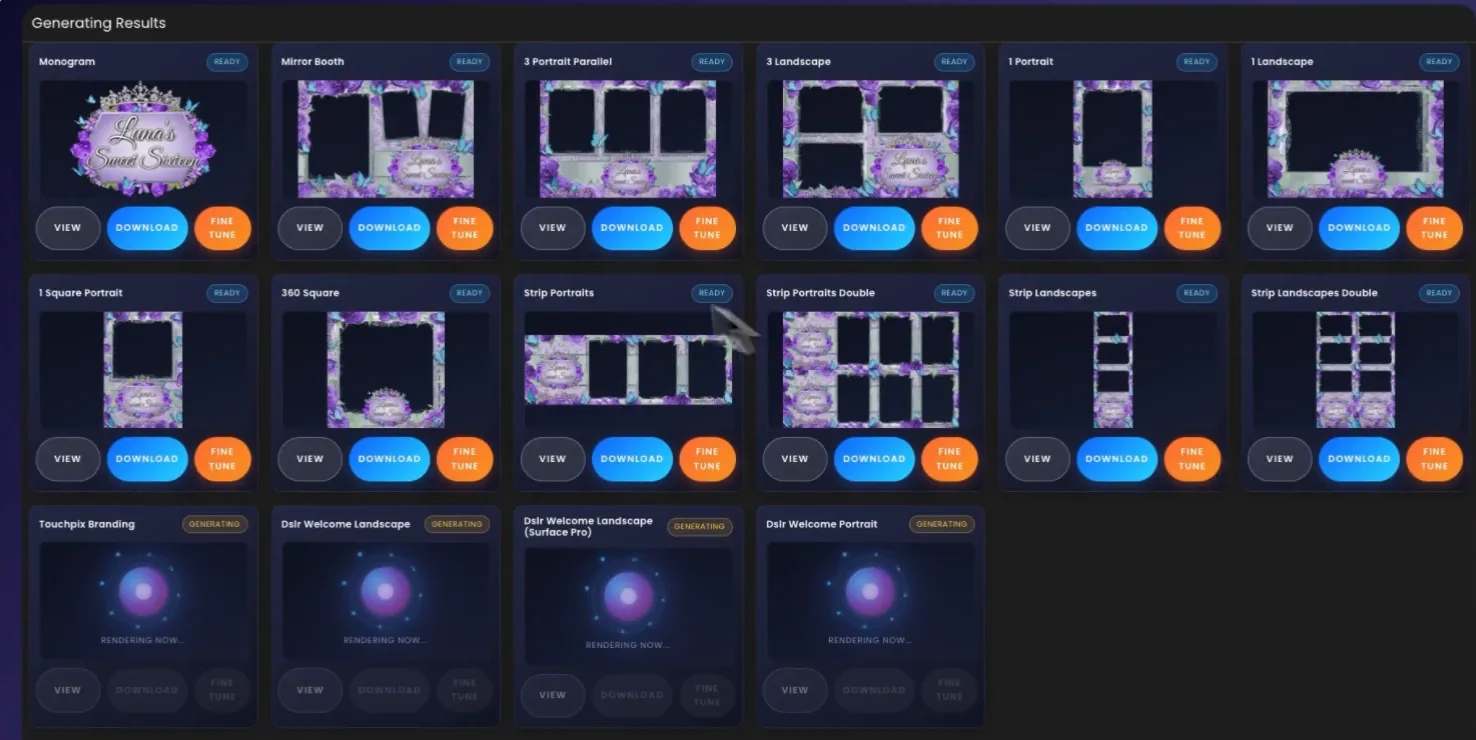
The results screen fills in as each layout finishes — a card per layout, marked GENERATING and then READY, with the monogram usually first. You do not have to wait for the whole batch to start downloading the ones that are done.
Each card offers View, Download and Fine Tune. That last one opens an Edit Image panel with presets — Vivid, Cinematic, Sepia, Reset — and sliders for brightness, contrast, saturation, hue, temperature, tint and vignette, then Download Image. It is there for the case where the print comes out darker than the screen suggested.
What lands is a production-ready PNG with genuine transparency in the photo slots, sized for the layout you asked for. Nothing to flatten, nothing to cut out.
Open the real file before you send it
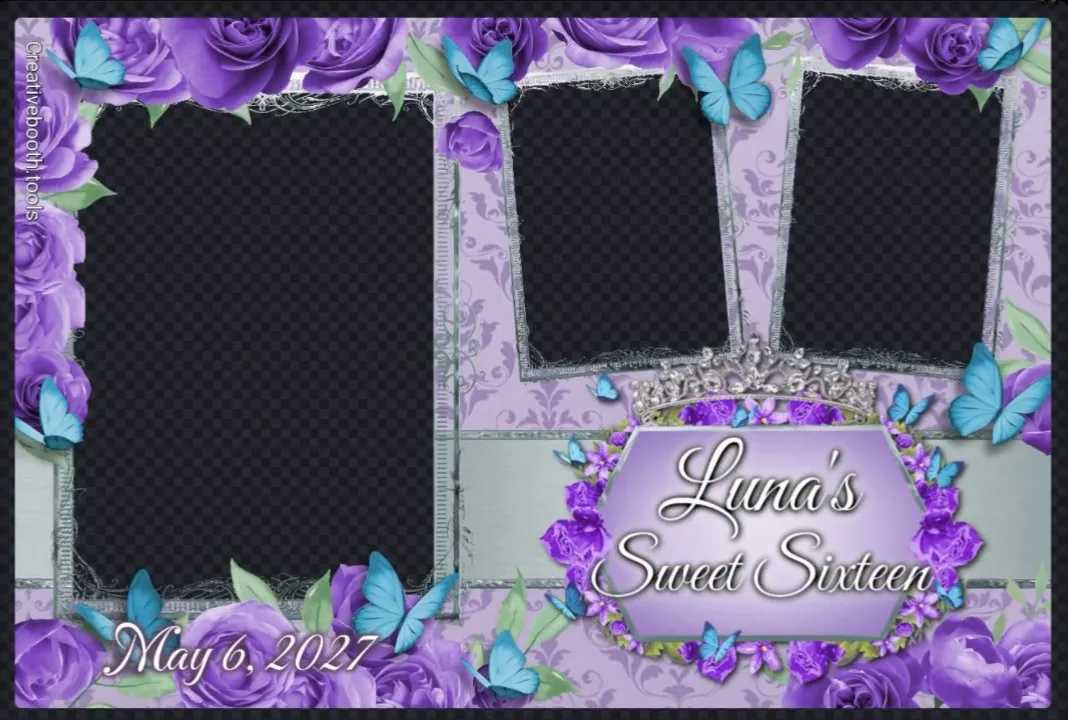
View shows the layout at full size, and it is the only place you see the thing your booth software will actually load. The checkerboard is not part of the design — it is how the browser draws transparency, and those are the areas guest photos drop into.
What to check: that the monogram sits where you expected, that the date is legible at this size rather than at thumbnail size, and that the photo slots are where the artwork implies they are.
On a trial account the file carries a watermark down the edge. It comes off on a paid plan — the design itself is finished either way.
Getting better results
Pick the theme on composition, recolour later
A thumbnail in the wrong colours with the right photo arrangement is a better starting point than the reverse. Step 2 fixes colour in seconds; nothing fixes a layout that does not suit the venue.
Always Generate All
It is the same single credit as picking one layout. The strips and the welcome screens are what the operator asks you for at 6pm on the Saturday.
Use Preview Date before settling on a font
Script faces read very differently at template size than they do in a dropdown. Waterfall and Italianno look similar in the list and nothing alike on the print.
Turn the brand line on for every job
It costs one field and it is the cheapest marketing a booth business has — every print that leaves the event carries it.
Keep the monogram file
It comes back as its own layout. That same artwork goes on the welcome sign, the seating chart and, if the venue has a screen, into a video loop.
Run it twice for a client who cannot decide
Two credits buys two complete, coherent sets rather than one compromise. Because the tool is deterministic, the only difference between them is what you actually changed.
Common mistakes
Using Let Me Pick to save credits
It does not save any. The credit is spent per run, not per layout, so hand-picking only limits what you walk away with.
Going back to step 4 after filling in the monogram form
Changing the monogram route clears the style and the text you had entered on step 5. Decide between creating, uploading and skipping before you start typing.
Uploading a JPEG as your monogram
The upload route takes PNG. A JPEG has no transparency, so what you get is your logo sitting on a white rectangle in the middle of the artwork.
Turning the colour harmonize switch off
It is on for a reason. With it off, the monogram keeps its own palette and reads as a sticker on top of the template rather than part of it.
Leaving compression on out of habit
It shrinks the file at the cost of fidelity in the artwork. Unless your booth software rejects large uploads, you are giving up quality for nothing.
Judging the design from the thumbnail grid
The results cards are small. Open View on the layout you actually intend to print before you send anything to a client.
Or let AI design it
The Template Designer and the AI generator solve the same problem from opposite ends. This one gives you a finished design and a fixed set of controls: predictable, repeatable, and the right call when a client has approved a look or you need a second template that matches the first.
The AI route goes the other way — you show it an invitation or pick a reference image and it designs something that did not exist before. Better when there is no theme in the library that fits, or when the whole point is that nobody else has this template. It is a different walkthrough, and it is written up in full.
Read: how to make a photo booth template with AIFrequently asked questions
Do I need Photoshop or any design software?
No. Everything happens in the browser and the whole process is picking a theme, changing named options and typing a couple of lines of text. Templates come out as production-ready PNGs with transparent photo slots, so there is no post-production step.
How is this different from the AI template generator?
The Template Designer starts from a finished theme in the library and lets you change specific parts of it, so the same choices always give the same result. The AI generator creates an original design from a reference image or a description. Use this one when you need predictability, the AI one when you need something new.
How many layouts do I get?
Sixteen, counting the monogram: mirror booth, three-photo portrait and landscape arrangements, single portrait, landscape and square, 360 square, four strip variants, Touchpix branding and three DSLR welcome screens. Generate All produces the lot in one run.
Does picking fewer layouts cost less?
No. One run costs one credit whether you generate every layout or just one, which is why Generate All is almost always the right choice.
Can I use my own logo instead of a monogram?
Yes. Choose Upload your own on step 4 and drop in a PNG. It has to be a PNG rather than a JPEG, because the file needs a transparent background to sit properly on the artwork.
Can I put my studio branding on the template?
Yes, through Add your brand on the Personalize step. It sets a small brand line into the design, and it is what turns a template into something recognisably yours.
What if the theme I want is not in the library?
Use Request a Theme on the first step. It takes a description and an example image, and new layouts are typically added within 24 to 48 hours for everyone.
Can I adjust the colours after generating?
Yes, up to a point. Fine Tune on each result card opens an image editor with presets and sliders for brightness, contrast, saturation, hue, temperature, tint and vignette. For anything more structural, go back through the wizard and generate again.
How long are my files available?
Generated files stay in your dashboard for 30 days and are then deleted automatically, so download them before that. You can always run the tool again — the same choices produce the same design.
Customize your first template
Pick a theme close to the event, spend two minutes on the colours, turn on the date and your brand line, and generate the full set. The first one takes fifteen minutes; by the third you will be doing it while you are on the phone with the client.