A generated template arrives finished: the artwork, the frame and the photo slots already cut out. What it cannot know is that the client wants the names bigger, a second monogram in the empty corner, or the whole thing a shade warmer.
That is the gap the Creative Editor fills. It opens the template you just generated as a canvas, lets you drop monograms on it, move them around and grade the result — and then writes the new version over the old one. Nothing is redrawn: the base template stays exactly as the AI produced it, and everything you add sits on top as its own layer.
This guide walks through the whole loop, including the part most people miss — you can generate a brand new monogram from inside the editor, without losing the composition you already have.
Before you start
- A generated templateThe editor opens on top of one. Generate a template first — the Open Creative Editor button sits right under the results, and the same button is on every template in your dashboard history.
- Credits, if you plan to generateComposing, moving, grading and downloading are all free. Only generating a new monogram from inside the editor spends a credit, and the button says so before you press it.
- A PNG of your own, optionallyA client logo or a monogram you already have works too. A transparent background gives the cleanest result — anything else lands as a rectangle.
- A quiet ten minutesThe composition is not saved as you go. Closing the editor throws it away, so it is worth finishing what you start in one sitting.
Where the monograms come from
The column on the right of the editor has two tabs, and they answer two different questions. The one you want depends on whether the artwork you need already exists.
Gallery
Every AI monogram you have generated in the last seven days, as a grid of thumbnails. Click one and it lands on the canvas. Nothing to fill in, nothing to wait for, no credit spent.
Create a new monogram
The full monogram generator, folded into the sidebar. Three AI routes plus the option to upload your own file — and whatever comes out is dropped straight onto the canvas.
The tabs are not exclusive. Most compositions end up mixing the two: something from the gallery for the corner, something new for the centrepiece.
Compose the canvas
The template fills the canvas and the monogram that came with it — if there was one — is already in place. Everything from here is direct manipulation: click a layer, then drag it.
Open the editor
From a fresh generation, Open Creative Editor is the wide button under the three result cards. From the dashboard, the same button sits on any template in your history.
If the template came out without a monogram, the card carries Add your monogram instead, which opens the editor straight on the creation tab. Same editor, different landing spot.
Put a monogram on the canvas
Click a thumbnail in the Gallery and it appears on the template. The first one lands in the slot the layout reserves for it; the rest cascade into the middle so they do not stack invisibly on each other.
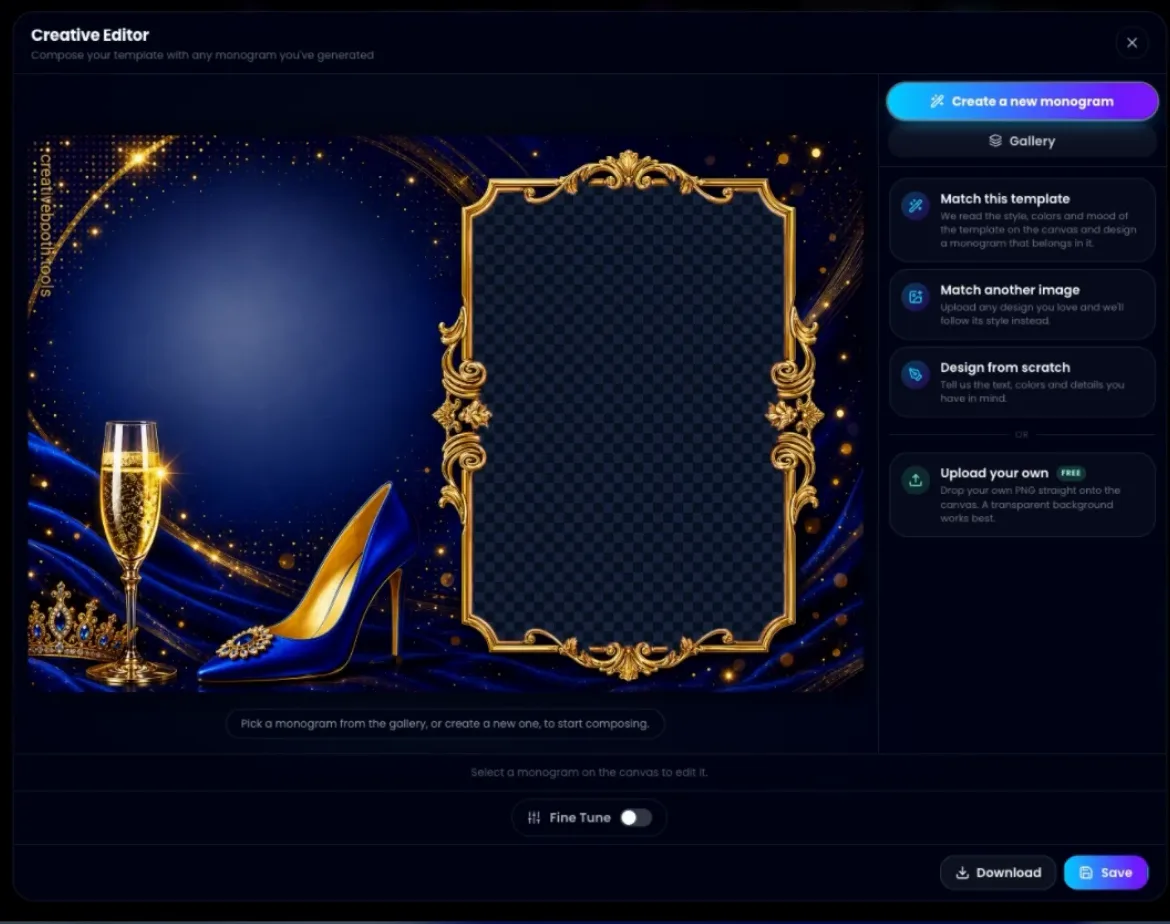
The hint under an empty canvas — "Pick a monogram from the gallery, or create a new one, to start composing." — disappears as soon as something is there.
Mind the checkerboard while you place things. Those grey squares are not decoration: they mark the parts of the template that are transparent, which is to say the photo slots the booth will fill. A monogram that looks well centred on screen can still be one that lands on a guest's face.
Move, scale and rotate it
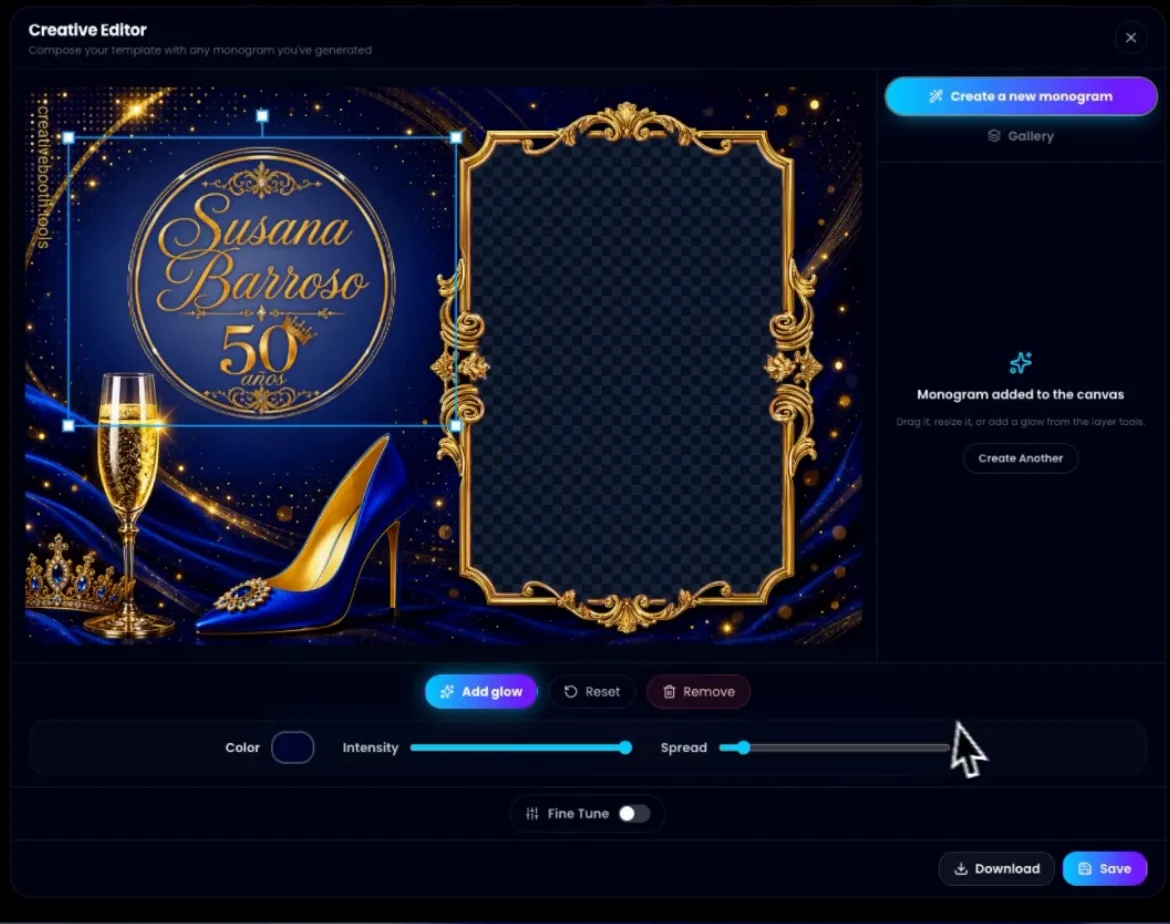
Drag from the middle to move. The four corner handles resize it, and the aspect ratio is locked, so a monogram cannot be squashed by accident. The handle floating above the selection rotates it.
Nothing is committed while you are dragging — the layer settles when you let go. On a phone or tablet the handles are drawn larger, because thumbs are not mouse pointers.
Use the layer tools underneath
Selecting a layer reveals three buttons below the canvas. Add glow puts a halo behind that layer and opens Color, Intensity and Spread to shape it — the fastest way to lift gold lettering off a dark background.
Reset drops the layer back where it started, at its original size. Remove takes it off the canvas; the Delete key does the same to whatever is selected.
The glow belongs to the layer, not to the composition. Two monograms can carry two different halos.
Create a monogram inside the editor
This is the part that is easy to miss. Create a new monogram is not a link back to another tool — it is the generator itself, running in the sidebar, with the canvas still sitting there untouched next to it.
Pick one of the four routes
Match this template hands the template on the canvas to the model as its style reference. No upload, no description: the colours, the ornament and the mood of the design you are looking at come back in the monogram.
Match another image does the same thing with a file you supply — the invitation the event was built around, usually. Design from scratch is the blank form: you say the text, the colours and the details.
Upload your own is the fourth option and the odd one out. It is marked Free because it does not touch the AI at all.
Fill in the short form
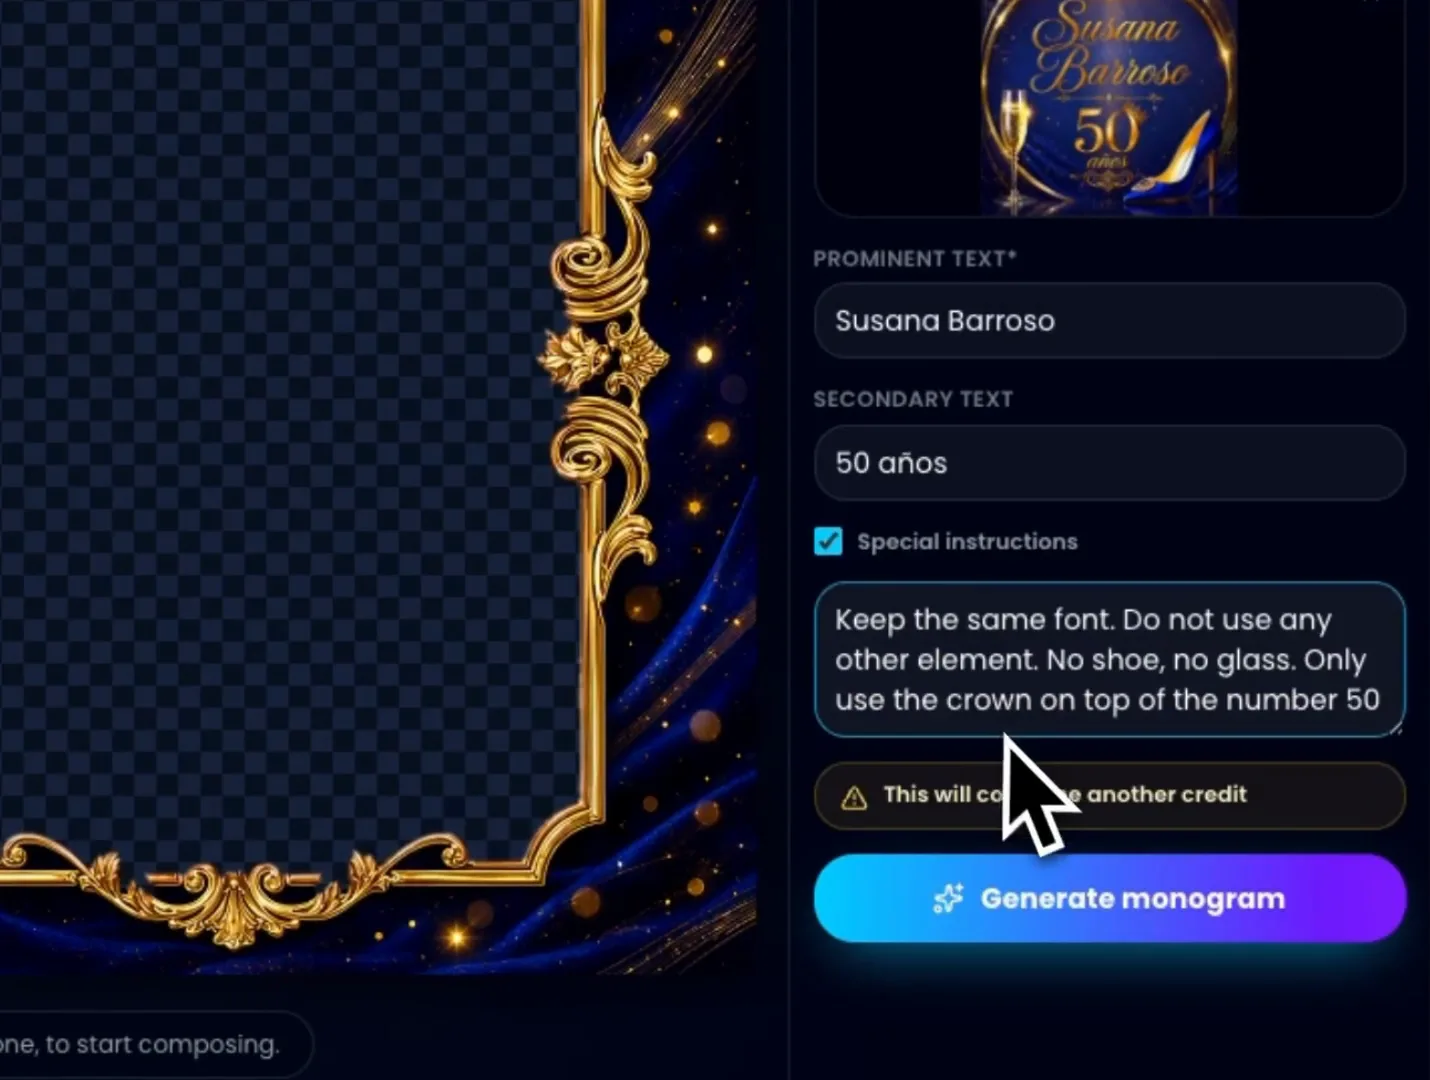
On the two matching routes the form is deliberately small, because the image is carrying the styling: Prominent Text is required — "Susana Barroso" in the walkthrough — and Secondary Text is optional, typically a date or an age.
On Match another image the Your Inspiration dropzone comes first. Drag the file in or click to browse; JPG, PNG and WEBP are all accepted.
Design from scratch asks instead for Prominent Text and Main Colour, both required. + More details unfolds Design Style, Describe any flowers you want, Describe any other element and Include a Princess Crown? — all optional, and a monogram carrying two well-chosen details usually beats one carrying five.
Add special instructions when the image is not enough
Ticking Special instructions on either matching route opens a free text box for the things a reference image cannot say on its own.
The walkthrough uses it to keep one element and drop the rest: "Keep the same font. Do not use any other element. No shoe, no glass. Only use the crown on top of the number 50." That is the useful shape — name what you want kept, rather than listing everything you do not want.
Generate, and let it run
The amber line above the button — "This will consume another credit" — is the last thing you read before Generate monogram. There is no format to choose: inside the editor everything comes out at 4:3, because you are about to scale and place it by hand anyway.
It takes one to two minutes. Leave the editor open; the canvas and everything already on it stay exactly where they are while it works, and starting a second run does not make the first finish sooner.
When it lands, the monogram is added to the canvas and selected, ready to drag. It also joins the Gallery, so you can drop a second copy without generating again.
Or upload your own instead
Upload your own skips all of the above. Pick a PNG and it is on the canvas immediately, at no cost.
The trade is worth knowing: an uploaded file is never stored. It is not registered anywhere, it will not appear in the Gallery later, and it lives only as long as this composition does. Save the template while it is there, or you will be finding the file again.
Grade it, download it, save it
Two things are left: making the composition look like one image rather than three pasted together, and deciding what happens to it.
Grade the whole thing with Fine Tune
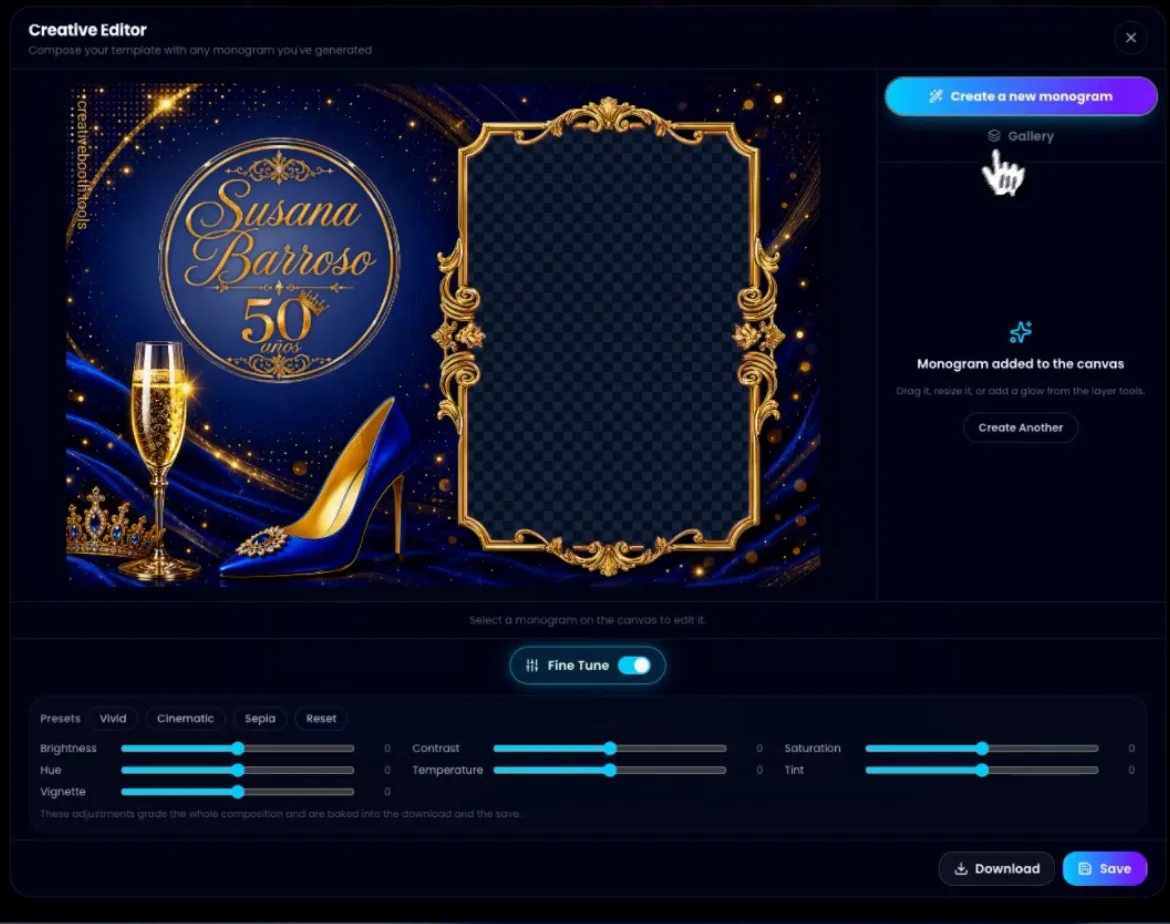
The Fine Tune switch at the bottom opens a panel of presets — Vivid, Cinematic, Sepia and Reset — and seven sliders: Brightness, Contrast, Saturation, Hue, Temperature, Tint and Vignette.
This grades the composition, not a layer. Template and monograms shift together, which is exactly what makes a monogram generated separately stop looking pasted on.
While any adjustment is on, the button carries an ON badge so you can tell at a glance that the download will not match the raw template.
Download a copy
Download exports the canvas as a PNG at the template's native resolution — not at the size it happens to be drawn on your screen — with the photo slots still transparent and the Fine Tune baked in.
On a phone or tablet this opens the share sheet instead, so the file can go straight to Photos or into a message.
Save, and mean it
Save replaces the final template in your history with what is on the canvas. That is the version you will find later, and the one every future download of that template gives you.
Closing the editor without saving discards the composition — the layers, the placement, the glow and the grading. There is no draft and no recovery, so save before you close.
Getting better results
Match the template before you describe anything
When the monogram has to sit on the design you are looking at, Match this template starts from that design directly. No description you write will describe it as accurately as the file itself.
Let the checkerboard place the layer
Scale the monogram against the transparent squares, not against the artwork. A composition that looks balanced on screen can still be one that puts a crown over a guest's head once the booth drops photos in.
Glow first, grade second
Add the halo to lift each monogram off its background, and only then reach for Fine Tune. Doing it the other way round means re-judging every glow after the colours move.
Save the good version before you experiment
Save, then keep playing. The editor reopens on the saved template, so a version you liked is never more than one click away — and there is no undo for a composition you closed.
Say what to keep, not what to avoid
In Special instructions, "keep the crown above the 50" works. "No shoes, no glasses, no ribbons" puts three things on the table that were not there before.
Common mistakes
Closing the editor to "check something"
The composition is not persisted. Stepping out to look at the dashboard and coming back means starting the layout again from an empty canvas.
Expecting an uploaded PNG in the gallery
Uploads are local to the composition on purpose — that is why they are instant and free. Only AI generations are stored, and only for seven days.
Generating again because the first result was close
A second run is a new design, not a variation on the last one, and it costs another credit. When something is nearly right, place it and fix it with scale, rotation and glow.
Grading a layer that is already too bright
Fine Tune moves everything at once. If one monogram is blowing out, lower its glow intensity rather than pulling the brightness of the whole template down with it.
Treating Save as a download
They do different jobs. Download gives you a file; Save overwrites the template that lives in your history. Most projects want both, in that order.
When you need another format
Everything generated inside the editor comes back at 4:3, which is right for a monogram that is about to be scaled onto a template and wrong for almost everything else.
For a monogram that has to stand on its own — a welcome sign, a square Instagram post, a gobo projection — generate it in the standalone monogram maker instead, where 3:2, 4:3, 5:4 and 1:1 are all on the table. It will show up in the editor's Gallery afterwards either way.
Open the AI monogram makerFrequently asked questions
Can I put more than one monogram on a photo booth template?
Yes. The canvas takes as many as you want, and each one is a separate layer you can drag, resize, rotate and give its own glow. The first one lands in the slot the layout reserves for it and the rest cascade into the middle.
Do I have to leave the editor to make a new monogram?
No. The Create a new monogram tab runs the generator inside the sidebar, and the result drops straight onto the canvas. Your composition stays exactly as it was while it runs.
Does editing a template cost credits?
Composing, moving layers, adding glow, grading with Fine Tune, downloading and saving are all free. Only generating a new monogram from inside the editor spends a credit, and the button warns you before it does.
Can I use my own monogram or logo?
Yes, through Upload your own. It is instant and free, and a transparent PNG works best. The file is not stored, though: it will not appear in the gallery later, so it only exists for as long as that composition does.
What happens when I press Save?
Your composition replaces the final template in your generation history. That becomes the version you download later. Closing the editor without saving discards the composition instead, and there is no way to recover it.
Why is there a checkered pattern behind the template?
It marks the parts of the template that are transparent — the photo slots the booth fills with pictures. Seeing them while you compose is what stops you placing a monogram where a guest's face will end up.
Which monograms show up in the gallery?
The AI monograms from your last seven days, whichever tool made them. Monograms you uploaded yourself are not included, because they are never stored.
Open one you already made
The fastest way to understand the editor is to open it on a template you generated last week and add a second monogram to it. Nothing is committed until you press Save, so the first ten minutes cost you nothing but the time.